15 Apr
computer case


We’ve received their MPG GUNGNIR 100 case - a rather peculiar name - but what kind of product do we find behind this name? I can say as much as we are dealing with a mid tower, but in terms of features what do we get? Well, you’ll just have to read this review to find out. As always, we will start out by going over the listed specifications down below, and after that, we’ll have a look at the case itself.

Specifications and Features
I’ve stopped by MSI’s website in order to fetch some information on the MPG GUNGNIR 100 case for you. Below, I’ve listed these specs, and I’ve included two images that show some of the additional features being offered with this case.
Type: Mid Tower
Product name: MPG GUNGNIR 100
Weight: 9.3 kg
Dimensions: 510 x 227 x 525 mm (DxWxH)
Motherboard support: Mini-ITX, Micro-ATX, ATX and E-ATX
Front I/O: 2 x USB 3.0 and audio in/out
Expansion slots: 7
Maximum GPU length: 400 mm
Maximum PSU length: 200 mm
Maximum CPU cooler length: 170 mm
Built-in lights: Yes
Radiator support: 120 / 140 / 240 / 280 / 360 / 420 mm
Cooling layout:
Front: 3 x 120 / 3 x 140 mm (3 x 120 mm included)
Top: 3 x 120 / 2 x 140 mm
Rear: 1 x 120 / 1 x 140 mm (1 x 120 mm included)
A Tour Around the MSI MPG GUNGNIR 100 Case
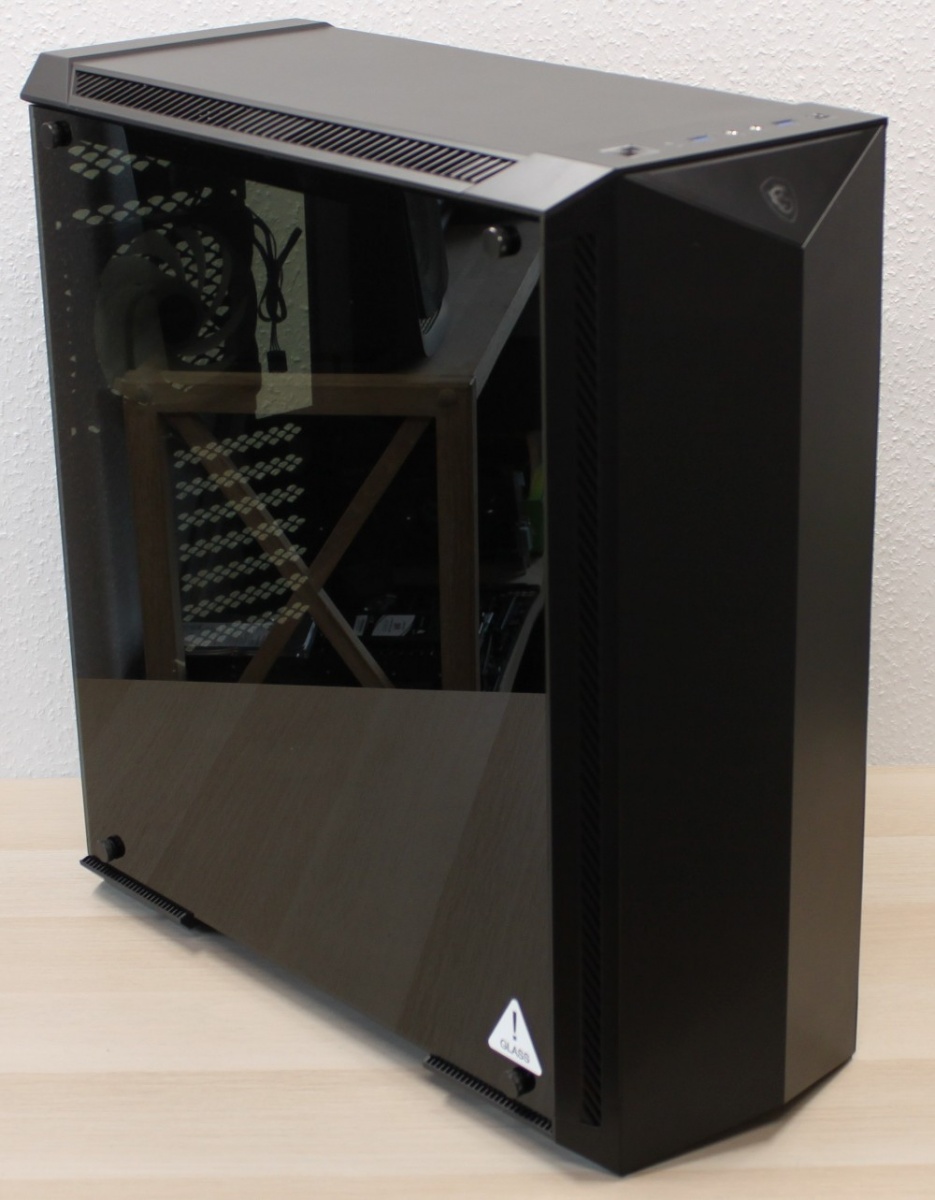
As always, we start our tour on the exterior with two overview shots. Below, we see the MPG GUNGNIR 100 from the left, where we can see the large side panel made from tempered glass, whereas the other side features a simple blank metal plate. The mounting of the tempered glass is done in a typical fashion, with four thumbscrews - nothing new or fancy here. The design, at first glance, is rather anonymous, but it still features some sharp edges and angles that all add some character to the overall look.
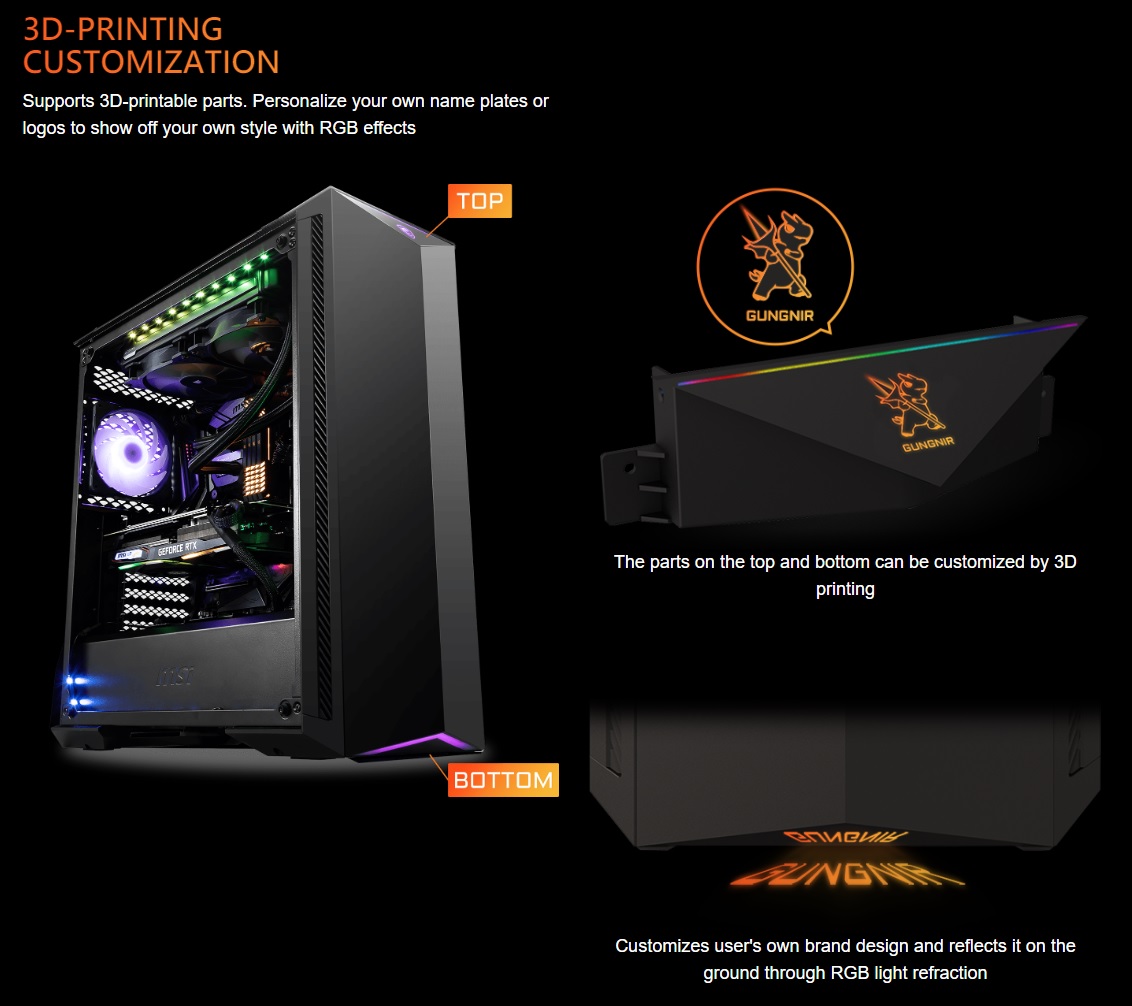
By simply grabbing the bottom of the front panel, and yanking it slightly, it can be easily unmounted. I’ve had quite a number of cases on my review bench to this date, and I must say that I am a bit disappointed with the quality of the plastic that MSI has used on the front panel here. It seems rather cheap and fragile when being handled. However, a mitigating factor with the front panel is that the plastic pieces on the top and bottom can be screwed off and replaced. MSI has provided blueprints on their website making it possible for you to 3D print replacement parts that can feature whatever details you wish - as long as you actually have a 3D printer.
Anyways, returning to the front panel, we find behind it no less than three 120 mm fans, however, without any LEDs. Instead, there’s an LED strip in the bottom and at the top of the front panel - more on these areas once we turn this thing on.

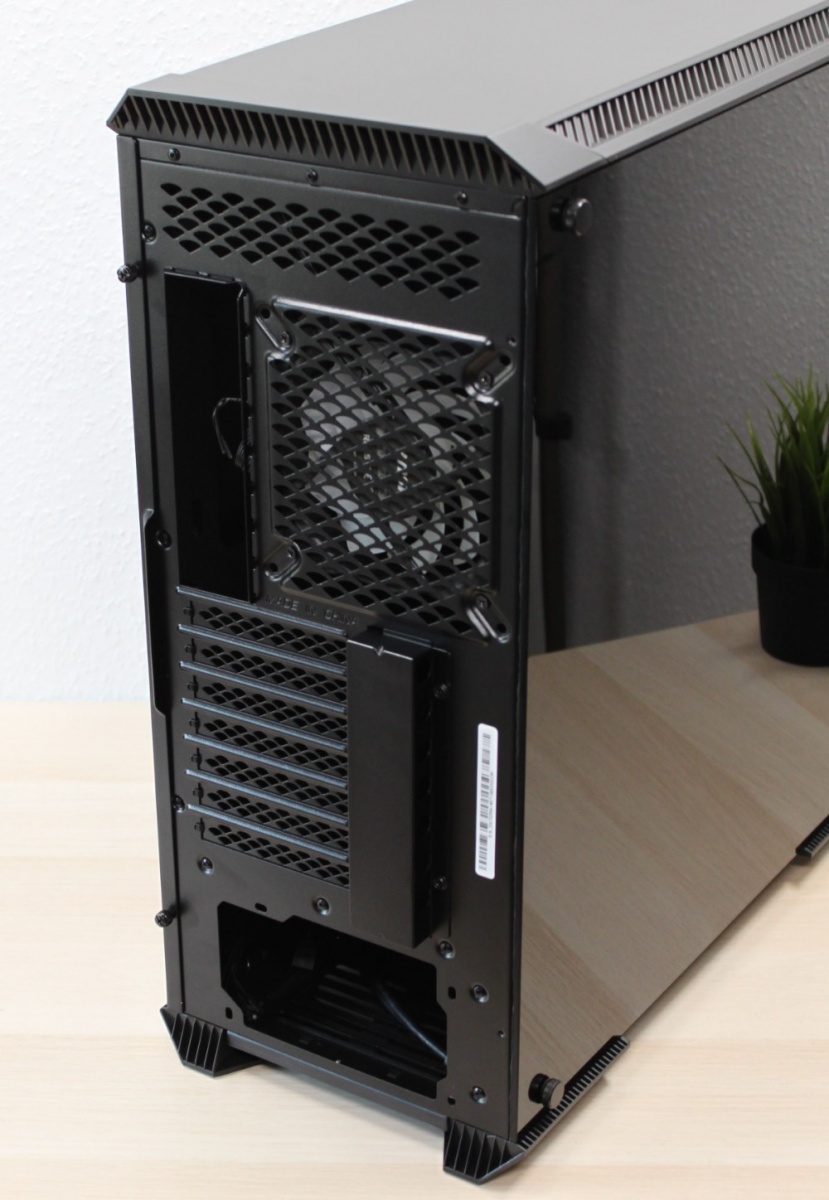
We continue our tour around the MPG GUNGNIR 100 with a look at the rear side. Here we find the classic layout with the PSU located at the bottom, and the seven expansion slots above it. Further up there’s the I/O shield cutout and yet another 120 mm preinstalled fan, this time featuring ARGB lights.
When lying the case on its side, we can get a look at the bottom. Down here, we find two large plastic feet that have rubber attached to them in order to minimize vibrations. Even though the plastic is the same type as used on the front panel and on the top, it feels a bit more solid down here since the pieces are larger and thicker. There’s, of course, also a dust filter installed here, for the PSU intake, which can be drawn out from the rear for cleaning purposes.
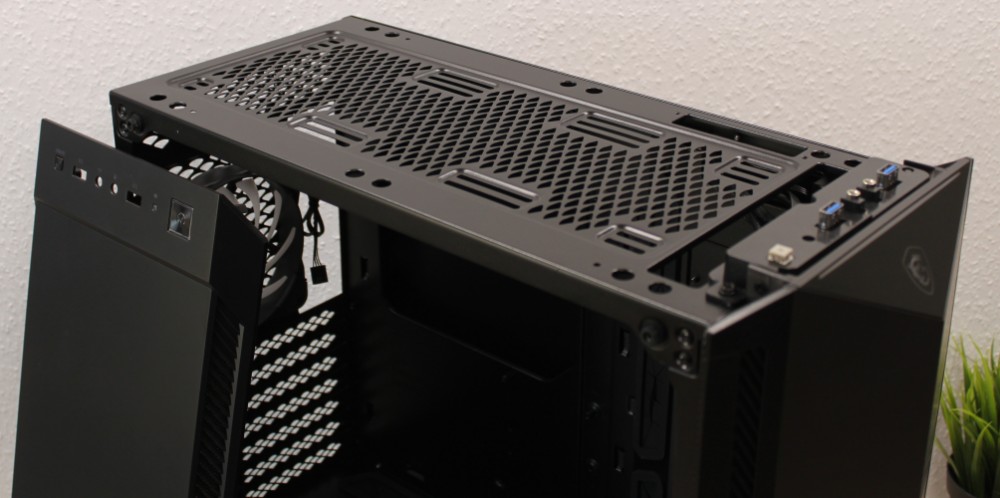
Next up, we’ll have a look at the top of the MPG GUNGNIR 100 case before continuing to the interior. Up here, we find the front I/O panel consisting of two USB 3.0 ports, as well as audio in and out. Thus, no fancy Type-C USB or anything else here. However, the reset button also works as a control unit for the built-in RGB lights. This can of course also be controlled via the motherboard, as long as it is equipped with a 5V ARGB connector.
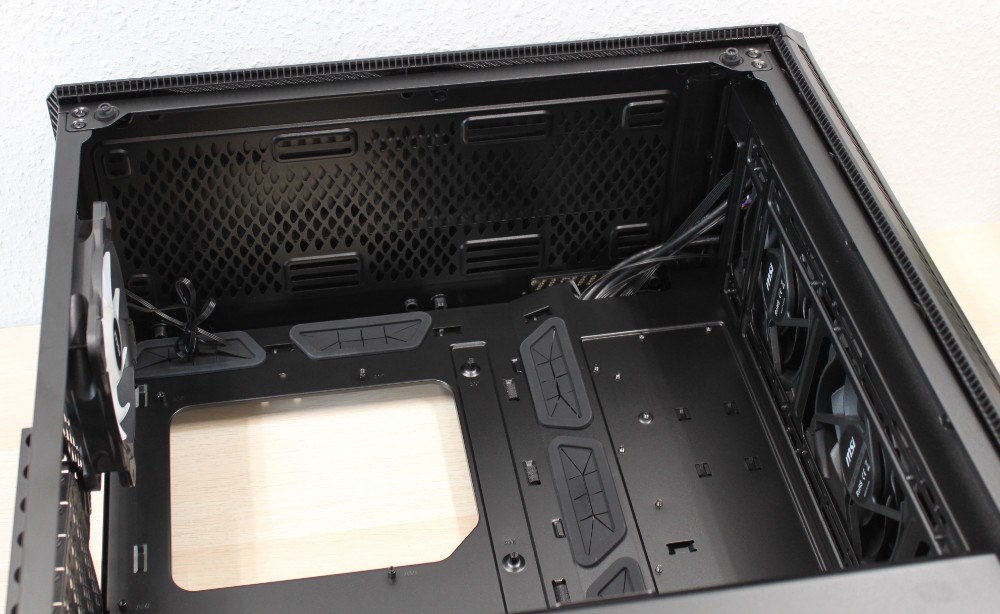
With the left side panel removed, the plastic top panel can also be clicked out, allowing for us to see what can be installed in terms of fans. Where the front offers the choice between three 120 or 140 mm fans, you have to “settle” with three 120 or two 140 mm fans - almost the same setup.
Let’s install the right side panel too so we can have a look at the interior of the MPG GUNGNIR 100 case. We’ll start with the rear, where we find the aforementioned 120 mm fan with ARGB. The seven expansion slot covers are all ventilated and are installed with regular screws and not thumbscrews, which is all right in my opinion. There’s a large cutout for CPU cooler replacement, and lots of options for cable management. Underneath the integrated PSU shroud, there’s a large hole at the front that allows for larger radiators to be installed. MSI have thought things over, and the interior layout makes sense.
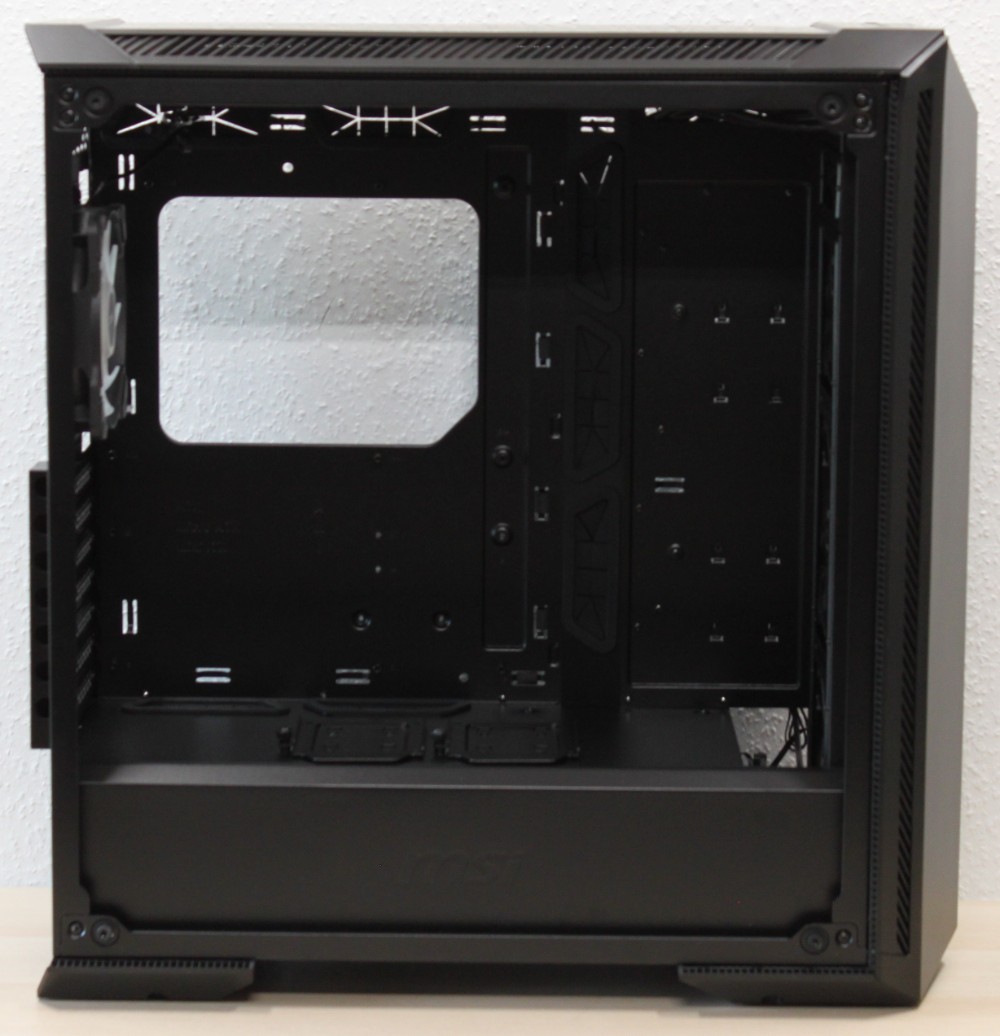
Apart from the hole at the front of the PSU shroud, we also find two cable management holes, ideally placed under the motherboard, as well as two brackets for 2.5” hard drives. Above the motherboard there’s a decent amount of space. This means that it shouldn’t be a problem installing both radiators and fans up here. More on that later.
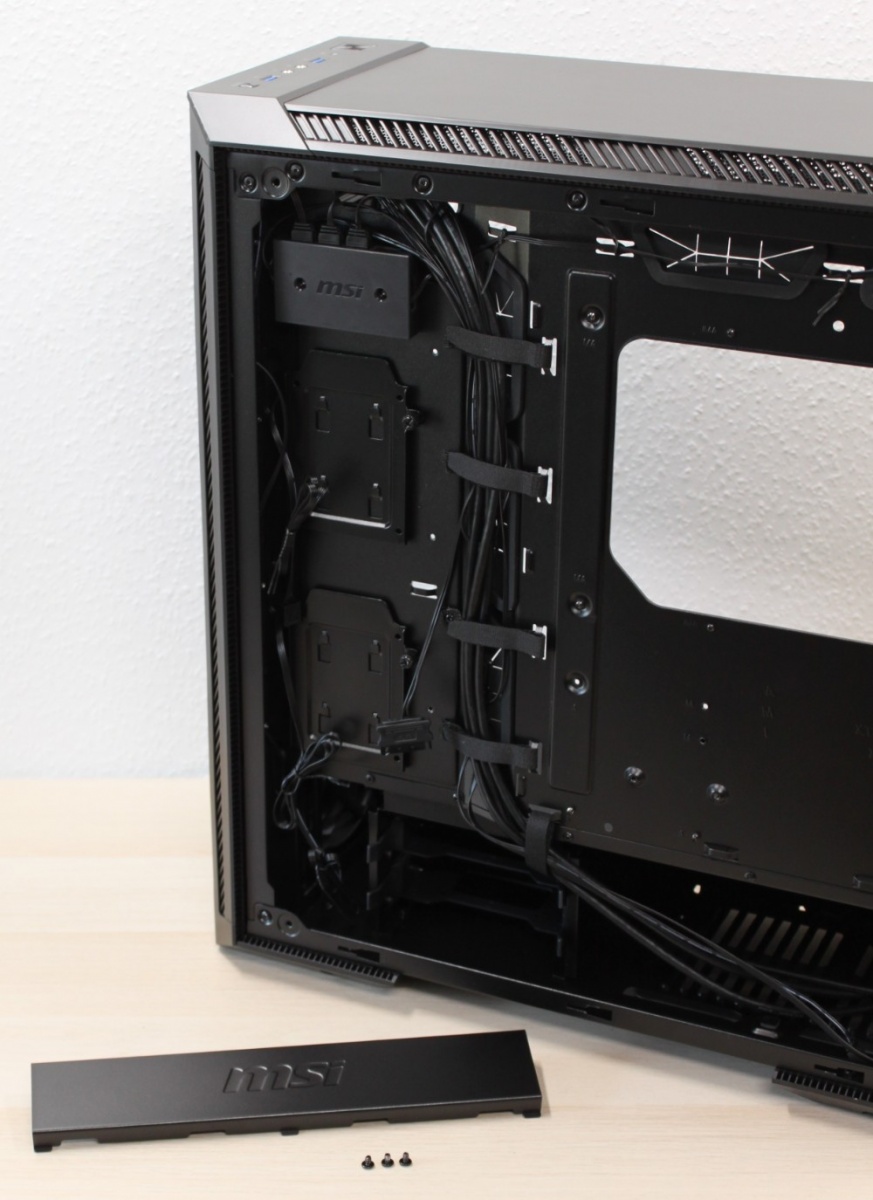
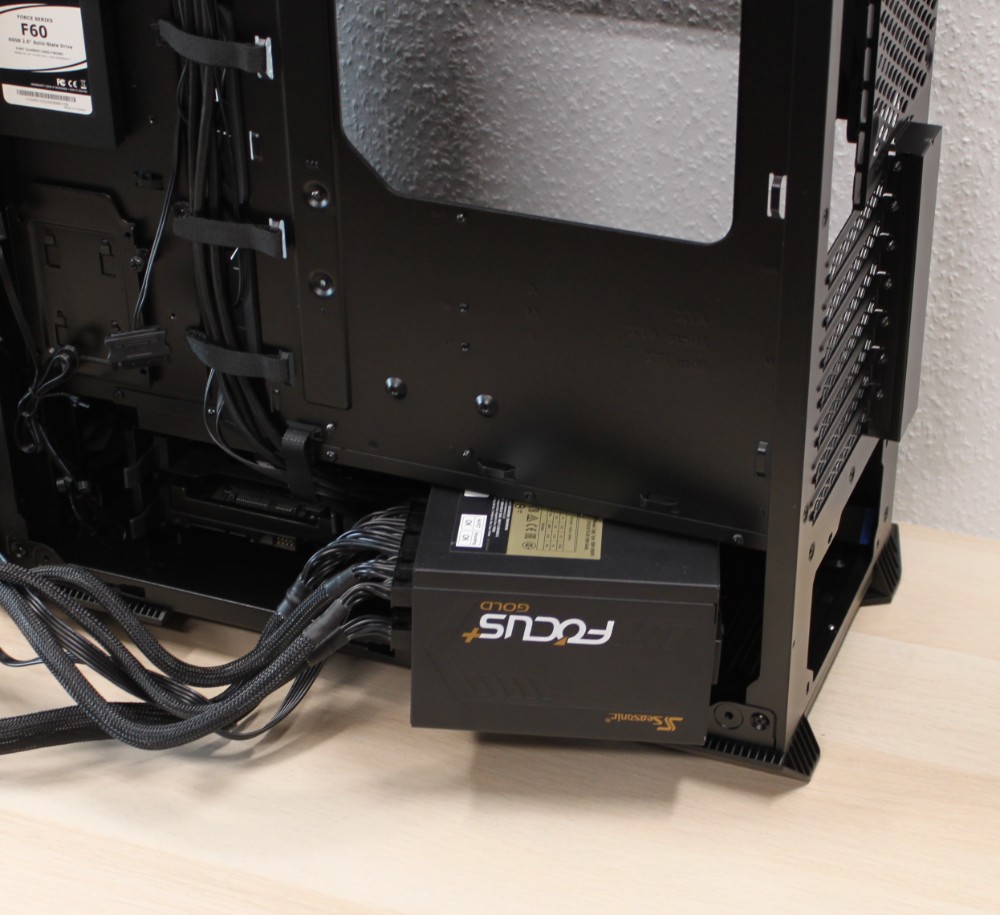
With the MPG GUNGNIR 100 turned 180 degrees, we can have a look at the other side. Here we see that MSI has done a good job drawing the factory-installed cables. You’ll also notice all the cable management holes, as well as locations to fasten zip ties. Beneath the PSU shroud, we find room for two 3.5” or 2.5” drives in the fixed cage. It’s also from this side that the PSU should be installed. Be aware that the PSU can be no longer than 200 mm with cables installed.
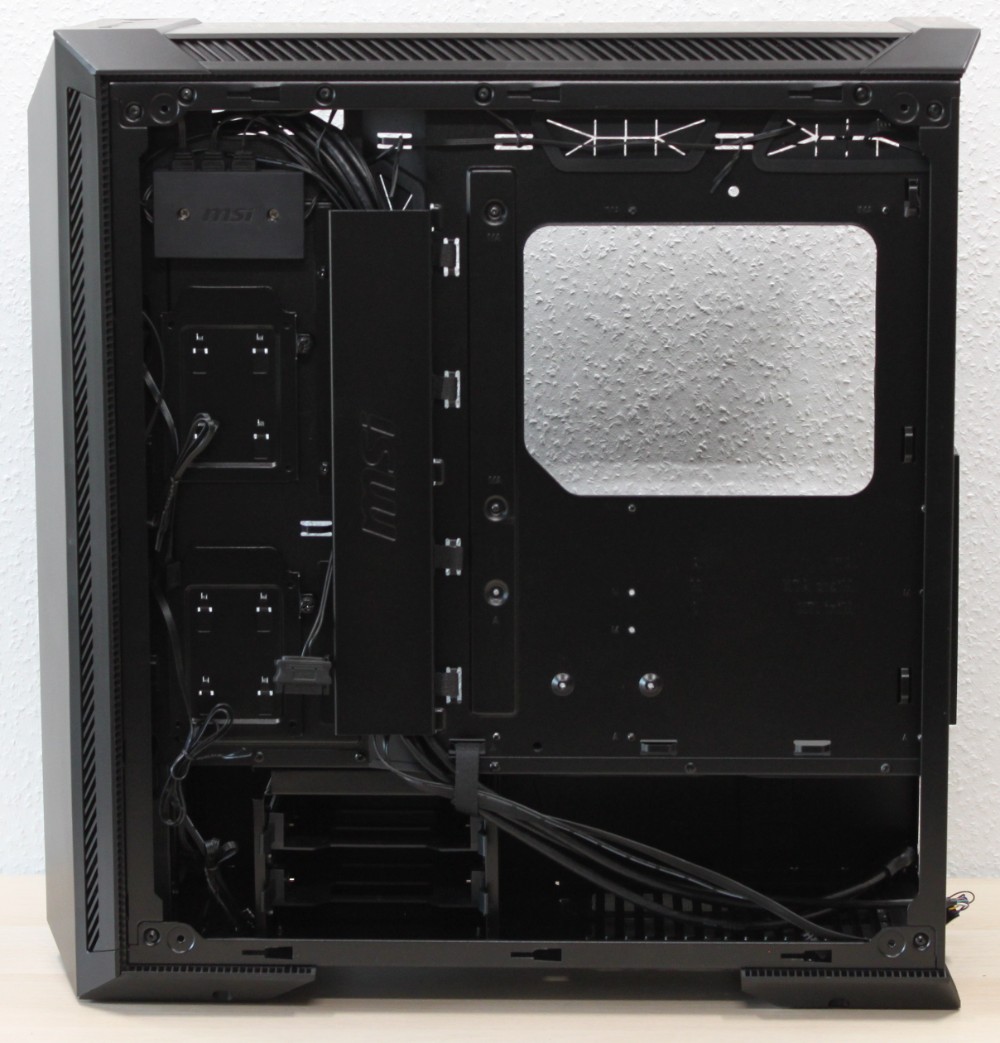
In addition to the two hard drive bays at the bottom, we find yet another two 2.5” brackets here, which lands us on a total of four 2.5” drives plus two 3.5” drives for those who are keeping count. So, in total, six 2.5” drives if no 3.5” are installed. Above the topmost bracket, we also find a small box with the MSI logo printed on. This box serves as an ARGB hub with support of eight units in total. This means that all of your ARGB devices can be collected and only occupy a single connector on the motherboard. Very smart! The preinstalled LEDs, are already connected to this hub, thereby taking up three of the eight connections.
There’s a metal rail that will help with cable management. It is fastened with three screws, and it can be left out all together, should you so desire. MSI has been kind to also include four velcro straps to the MPG GUNGNIR 100 case, in order to make cable management even easier. Anyways, whilst on the topic of cable management, let’s throw in some hardware.
Let’s start out by throwing some hard drives in. Whilst normal 3.5” hard drives can be installed with no tools needed, you’ll be needing screws and a screwdriver when installing 2.5” drives. This applies to both brackets and bays.
As mentioned, it’s also from the back that the PSU must be installed. I’ve said it once before, and I’ll say it again, if you’re using a modular or semi-modular PSU, it’s a really good idea to attach the cables that you’ll be needing before installing the PSU. Similar to what can be seen on the image below.
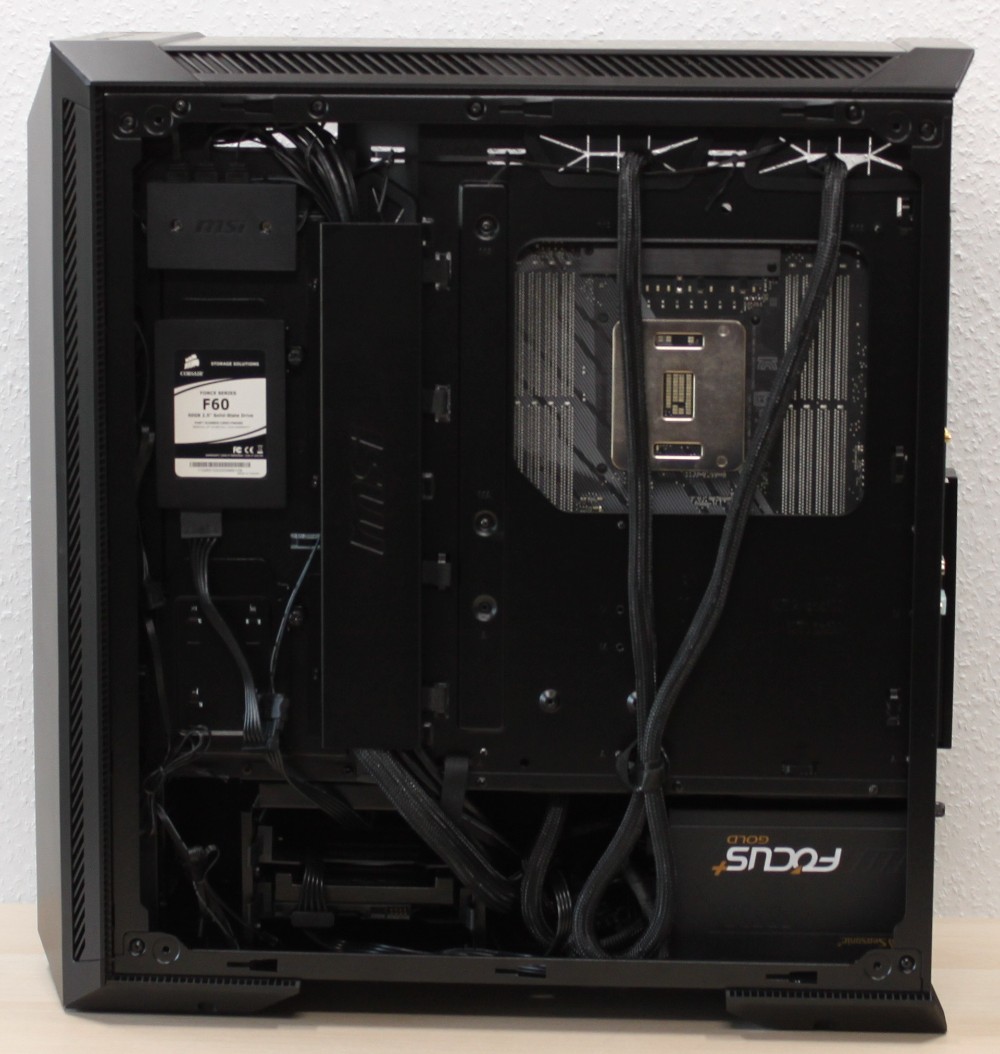
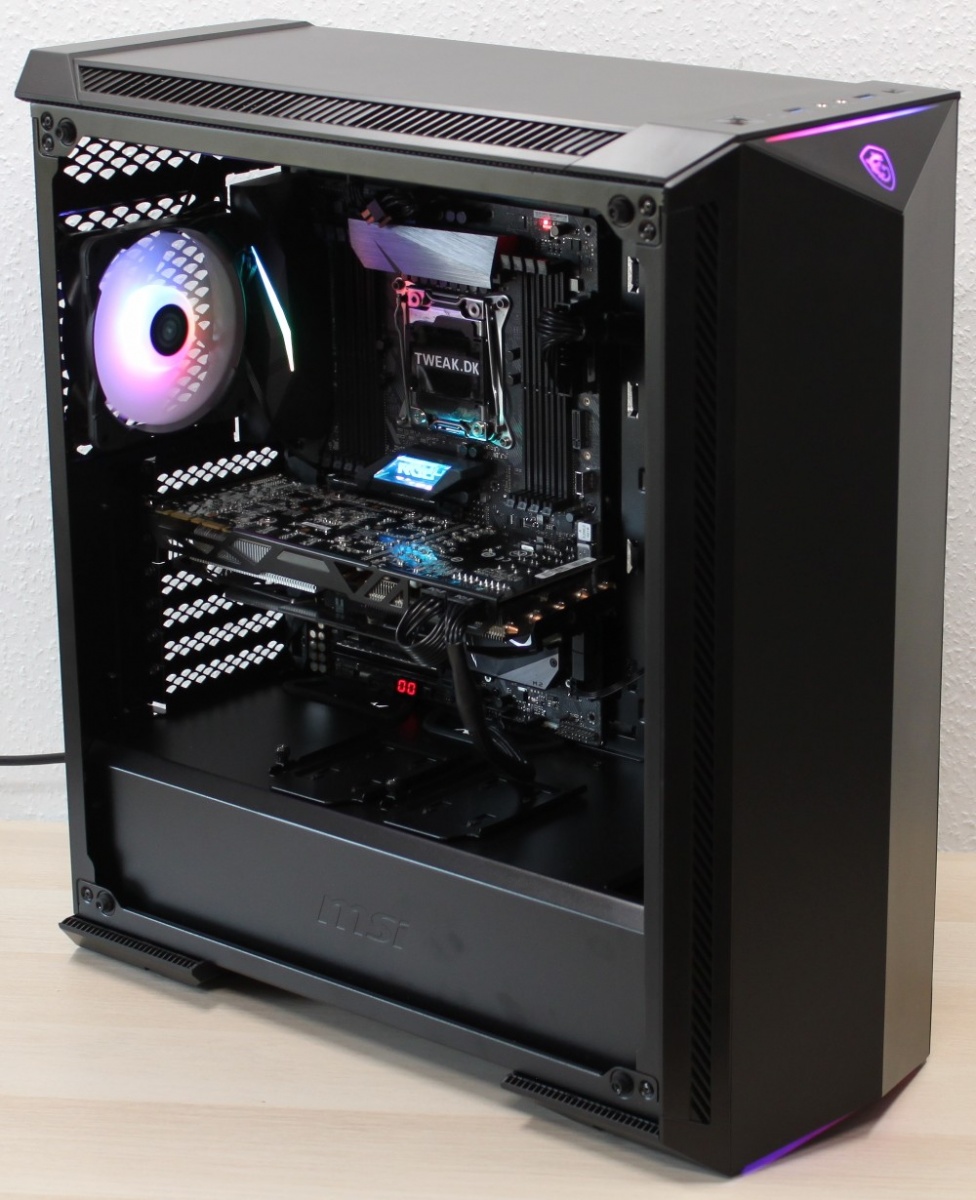
The MPG GUNGNIR 100 is effortless to build in. This is thanks to the open design and the nice layout with all the cable management options. All excess cables can easily be hidden under the PSU shroud, whilst the rest can be drawn more or less to your pleasing. There’s lots of places to fasten the cables, and the addition of a metal rail makes it easy to manage the large 24-pin connector, which can often be rigid and difficult to work with. The finished result can be seen below, and it’s quite satisfying, given that only 5-10 minutes went into this setup.
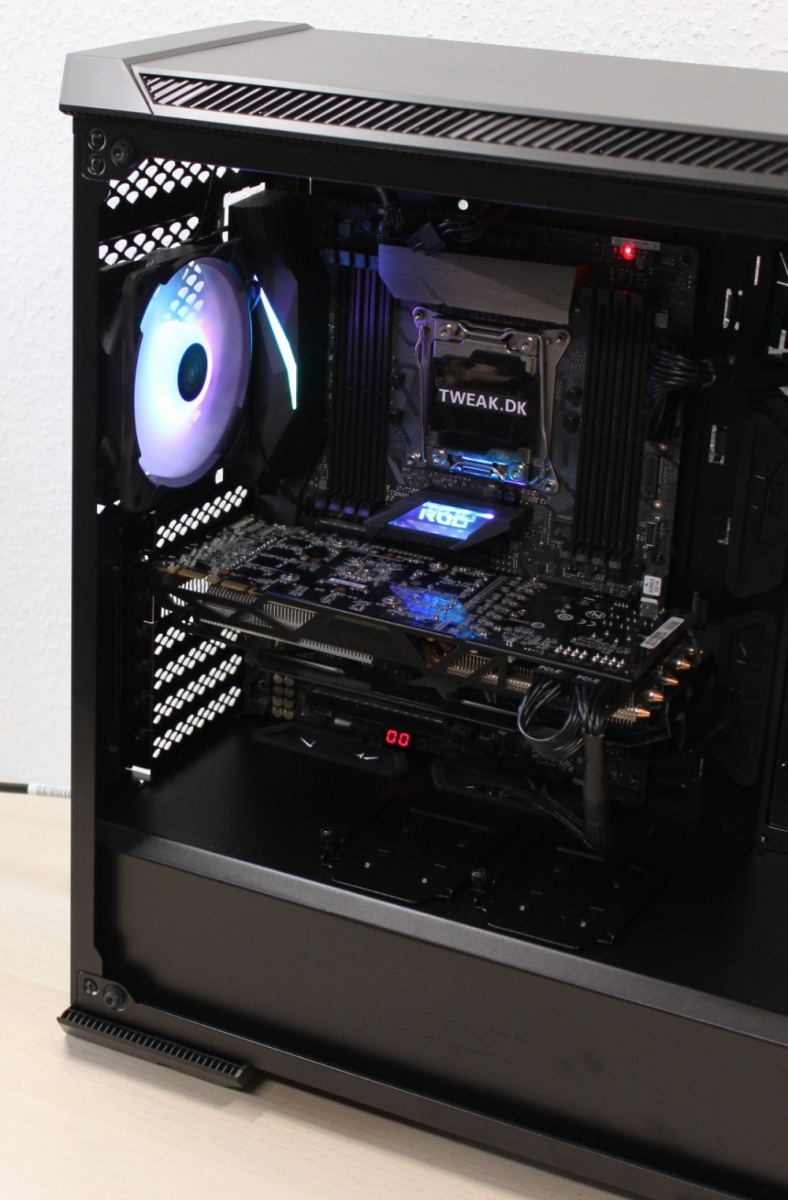
Let’s turn the other, more exciting, side towards the camera. I’ve turned on the preinstalled light on the rear fan so you can get an impression of what this looks like. Even with a full size GPU and an ATX motherboard, there’s still plenty of headroom towards the front of the MPG GUNGNIR 100. I’d even venture as far as to say that it would be wasteful not to install a radiator up here. The way that this case is designed, it’s not possible to install anything in this empty area, but if you have a 240/280/360/420 mm radiator installed, the space would be put to good use.
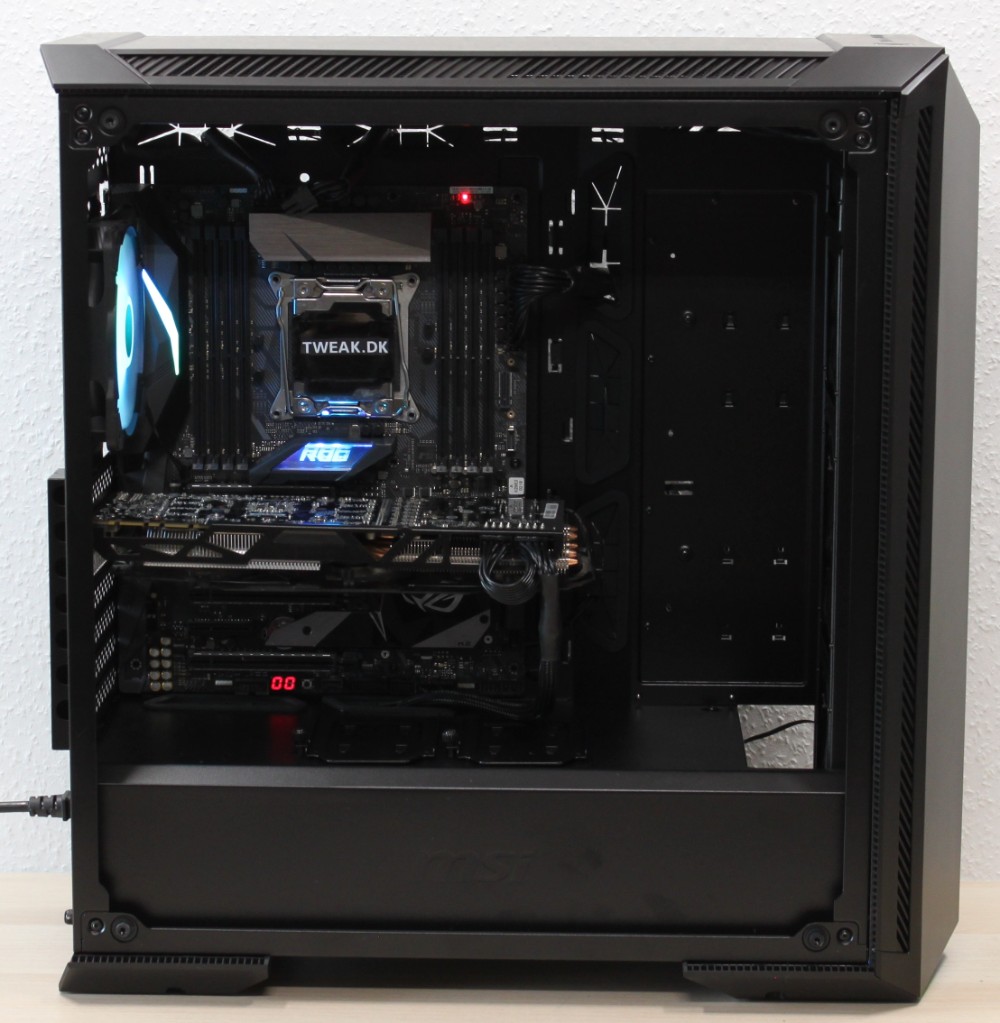
With the GPU installed in one of the top expansions slots, you’d be able to show off your SSDs, should you choose to install these on the PSU shroud, which, by the way, has the MSI logo embossed on the side. If we take a look at the top, we’ll be able to see just how much space is still left now that the motherboard has been installed. As I’ve mentioned earlier, you’ll have plenty of room for both a radiator, as well as fans, up here.
Before arriving to the conclusion, we’ll wrap up the tour around the MPG GUNGNIR 100 case with a round of photos of the built-in RGB lights. Below, we see the lights in the front, which is also the pieces that can be replaced by custom 3D printed panels.
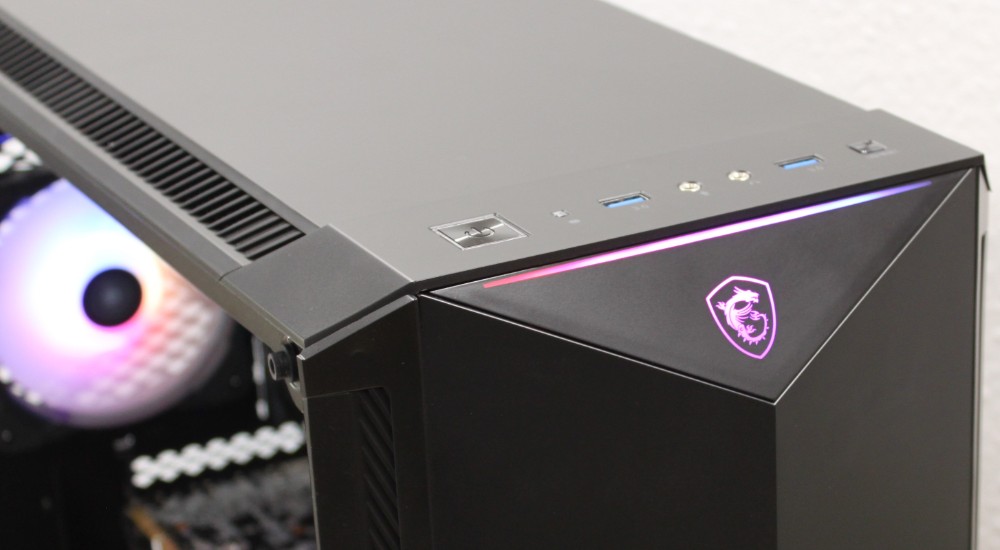
There’s a lot of different effects to choose from via the reset-button on the case. So, should you happen to have a motherboard lacking a 5V ARGB connector, there would still be ways to get full use of the lights of the MPG GUNGNIR 100 case. However, the options would be far more abundant when using software. After you’ve checked the next two photos you can proceed to read about the price and lastly the conclusion.
At the time of this writing (March 31, 2019), the MSI MPG GUNGNIR 100 is listed at around $160. Even though that this case has a lot of cool features, it still feels like a quite high price.
If you want to check out all the details on the MSI MPG GUNGNIR 100 case, you can stop by the official website by clicking the banner below, which will take you directly to the product page.

It’s time for us to wrap up this review of the MPG GUNGNIR 100 case from MSI. When I received the case, I had no clue what to expect. Despite that I’ve reviewed more than 100 cases during my time on Tweak, I’ve never seen one from MSI before. This mid tower shows that you don’t necessarily need many years of experience in order to produce something viable. The MPG GUNGNIR 100 has a lot of nice features to offer and a few that could have been improved a bit.
First and foremost, in terms of the design, MSI has gone with a more traditional and anonymous design, but the sharp edges of the top and front panels add character. The RGB lights are on point with the ARGB fan on the rear, the lights on the front and an eight-way LED hub included from the get-go. That’s the way! It’s also a very cool feature that MSI provides the option of custom printing parts of the front panel by providing schematics of these on their website. Of course, this requires that you actually have a 3D printer at your disposal.
There’s plenty of room for hardware, with both the support of E-ATX motherboards and GPUs of up to 400 mm length. In terms of cooling you are also covered in that you can fit in large radiators in both the top and front of the MPG GUNGNIR 100 case. The only negative remark I have on the case is the quality of the plastic that is used on the front, top and bottom. It feels cheap and fragile when you are handling the panels. Add to that the rather high price, the MPG GUNGNIR 100 is a quite expensive mid tower which most normal consumers will find hard to stomach.
All in all, we arrive at a final score of 8.5/10 including our Safe Buy award. This is a case that fulfills its purpose and then some. The implementation of the RGB hub, including four fans and the option to 3D print parts, thereby adding your own personal touch are awesome features that add to the positive score. Overall, it’s a job well done by MSI and I didn’t expect that the first ever case from MSI that I would be reviewing is in the calibre that the MPG GUNGNIR 100 is in.
Nice design
RGB lights in front and rear
8-way ARGB hub included
Four fans preinstalled (one of which has RGB)
Option to 3D print top/bottom parts of front panel
Fine support of both hardware and cooling
Side panel in tempered glass
The plastic material feels a bit cheap
Rather high price tag