17 Apr
storage


Even though there is an abundance of cloud services available on the market these days it can still be an advantage to have your files stored locally as well. Especially if you work with videos and photos, where those large files can be cumbersome to transfer back and forth between your cloud storage and local storage.
Watch our product video below (Danish).
With today’s test of Synology DiskStation DS620slim NAS, we approach the product with the mindset of wanting to have a local storage solution, but also a NAS device that doesn’t occupy too much space.
Synology DiskStation DS620slim is a small NAS device that provides local storage, but in a small form factor, which most consumers will be able to fit into their office or at home.
However, it’s not just a simple network connected hard drive. The DS620slim also offers hardware capable of more than that, e.g. running virtual machines, various local servers and much more.
Specifications of Synology DiskStation DS620slim
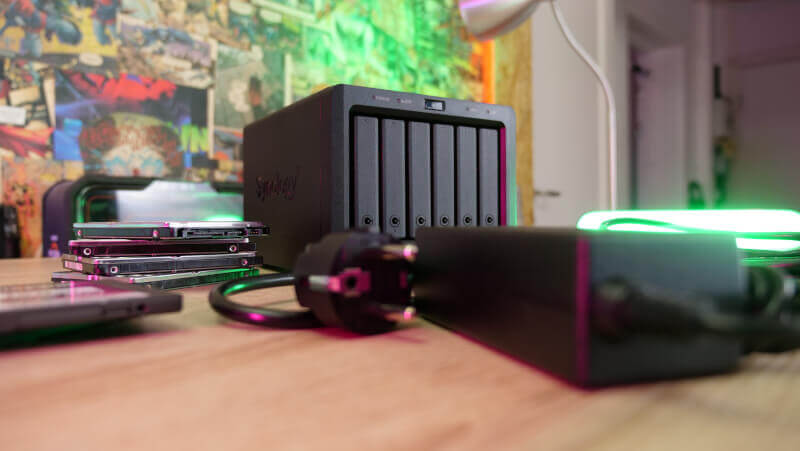
The DS620slim from Synology is a mini 6-bay NAS device that utilizes 2.5-inch storage devices rather than your typical 3.5-inch ones that are commonly used in NAS devices.
Synology DiskStation DS620slim is equipped with an Intel Celeron J3355 Dual Core CPU with a base clock of 2.0 GHz and a boost clock of up to 2.5 GHz. This is then combined with 2 GB DDR3L RAM, but with the option of upgrading with an additional 4 GB, allowing for a total of 6 GB RAM. This can be added for around $100 with shipping included.
Synology DiskStation DS620slim can house a total of six storage devices and has a maximum storage capacity of up to 30 TB, if you use 6 x 5 TB drives. It supports both mechanical hard drives as well as SSDs.
Another option is to run with four or five mechanical hard drives and then to use the remaining space for one or two SSDs that acts as cache.
The DS620slim can be configured to run in different raid types:
Synology Hybrid RAID (SHR), Basic, JBOD, RAID 0, RAID 1, RAID 5, RAID 6 and RAID 10.
The Design of Synology DiskStation DS620slim
The DS620slim is a nice little NAS. It measures only 121 x 151 x 175 mm, and weighs a meer 1.4 kg without any hard drives or SSDs installed.
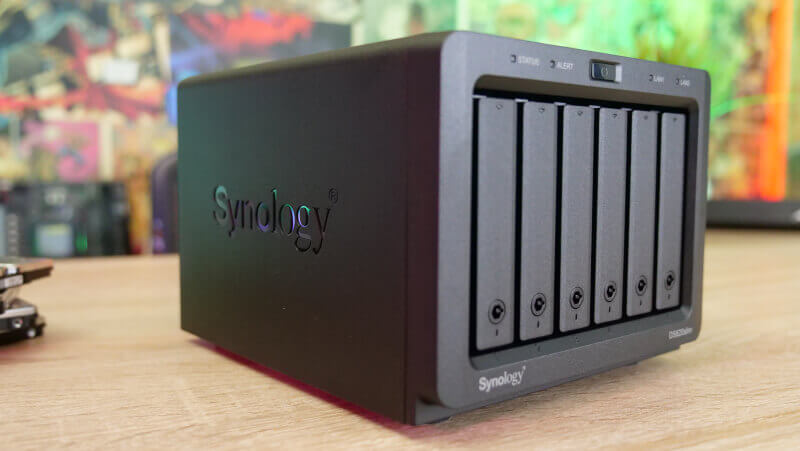
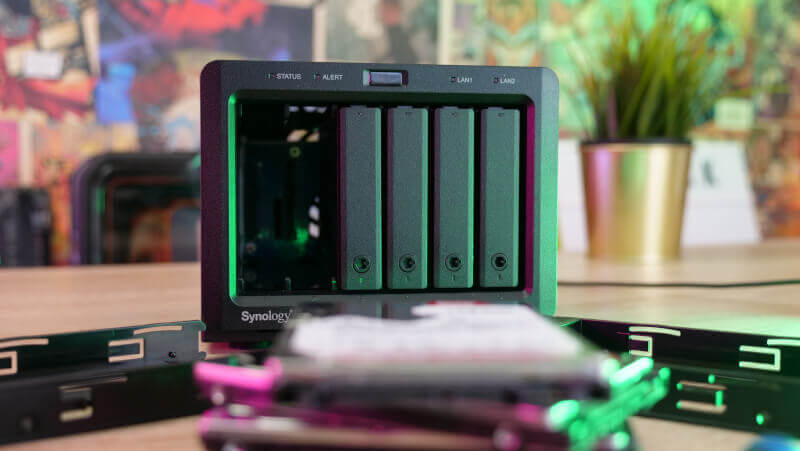
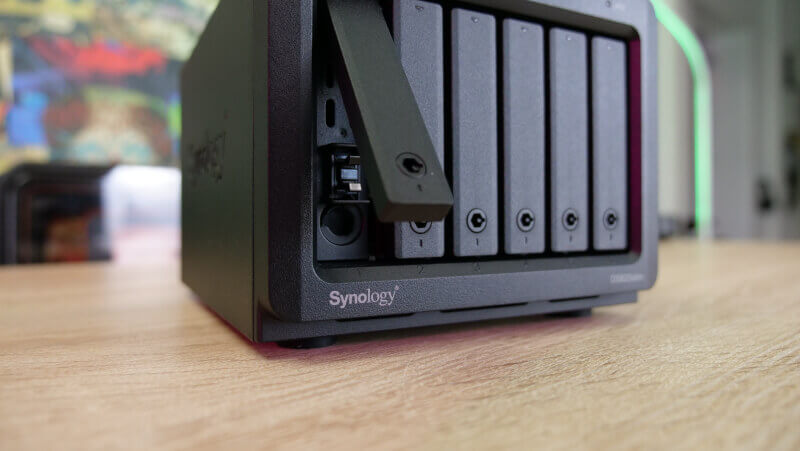
The NAS is designed in a black textured plastic, and it feels, despite its small size, both solid and well constructed. In the front, Synology DiskStation DS620slim offers quick access to the six drive bays that are hot swappable, and allows for the storage devices to be easily removed with a spring mechanism.There’s a small lock on every drive bay, and two keys are included with the product. The point of this locking mechanism is probably more so to ensure that none of the drives are disconnected by accident than for security reasons. The locks are also easily picked using just a pair of scissors or something similar, in case you’ve misplaced the keys.
Aside from the drive bays, the front also has a power button at the top, along with four status indicators.
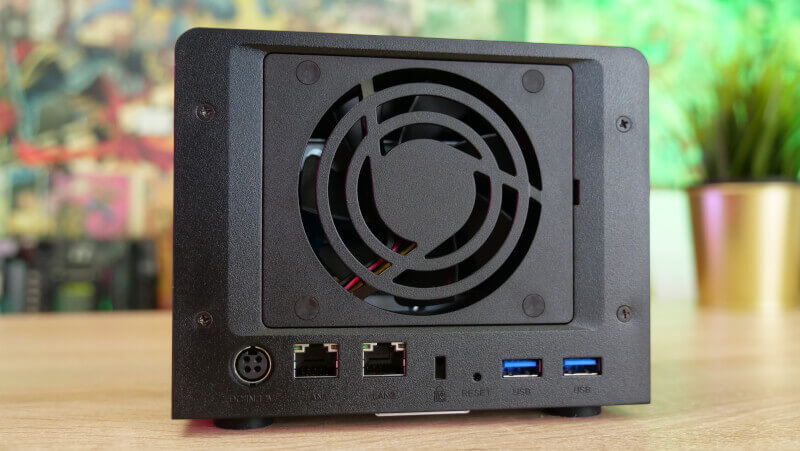
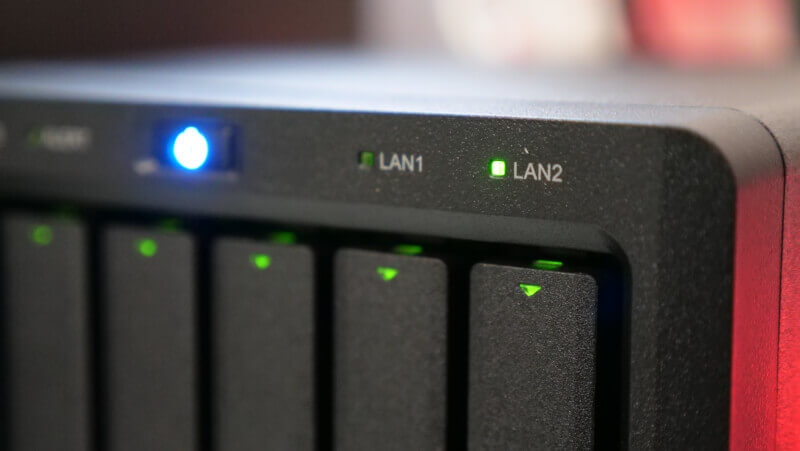
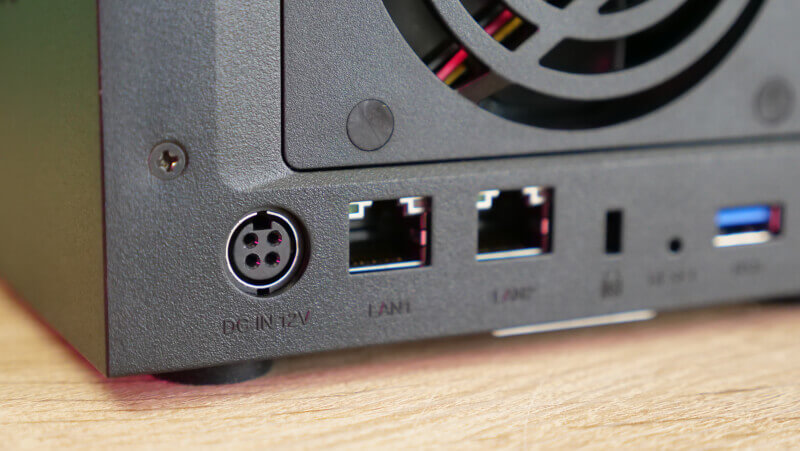
On the backside of Synology DiskStation DS620slim we find two Gigabit LAN ports that can be combined in Link Aggregation that allows for improved network data transfer speeds. The product also comes with two network cables; each 1 m in length.
Synology DiskStation DS620slim is equipped with two USB 3.0 ports so you can connect external equipment. Lastly, you have the power connector for the external 65 W power adaptor, a Kensington lock and the 80 mm fan that ensures fresh air passes through the drives.
Installing Synology DiskStation DS620slim
The installation process of Synology DiskStation DS620slim is pretty simple and straightforward. You’ll have to plan ahead, though, as to what configuration and which storage devices you intend to use, since this will bear influence on how the system as a whole will be configured.
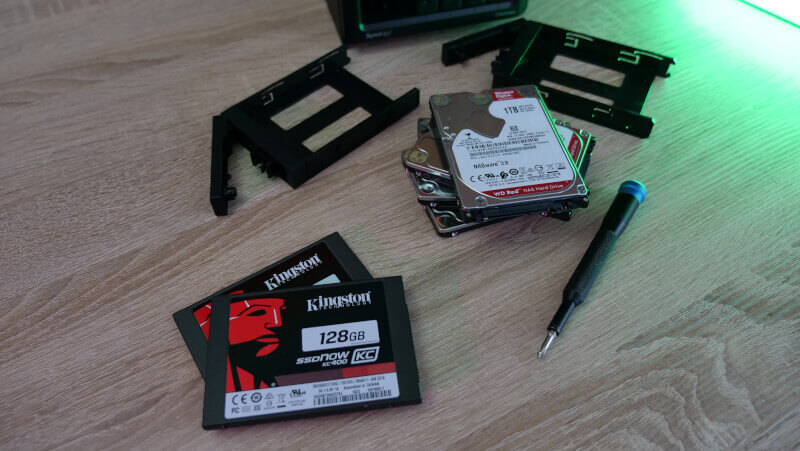
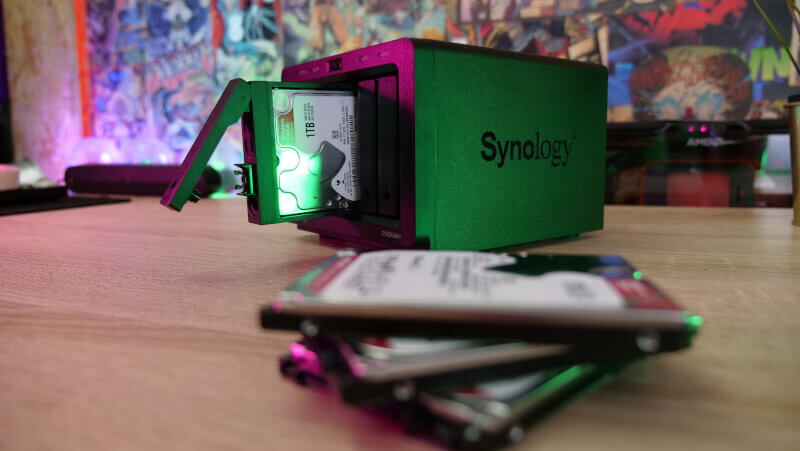
The DS620slim, as previously mentioned, has room for up to six 2.5-inch storage devices, and it can be both SSDs or mechanical hard drives.
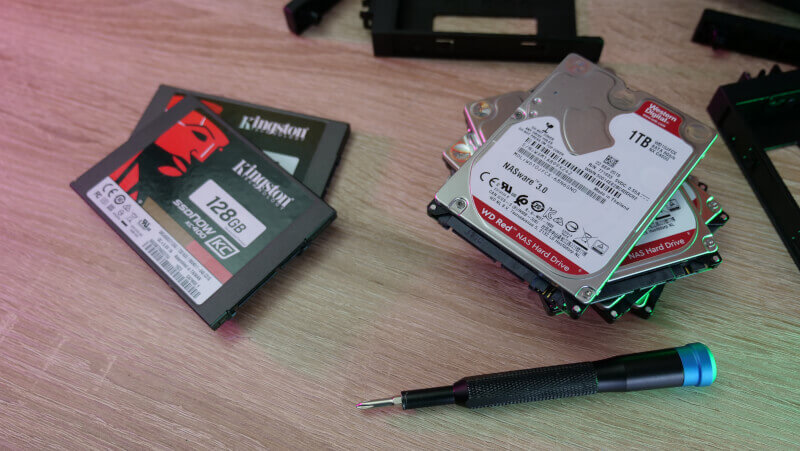
In my test setup, I opted for four Western Digital Red 1 TB mechanical hard drives, along with two Kingston 128 GB KC400 SSDs. This gives us ample room to set up primary storage using the four mechanical hard drives and the two SSDs will then be used to provide SSD cache.
The practical installation of the drives is easy with the removable hard drive sleds. It does require the use of tools, though, as the hard drives and SSDs must be fastened with screws to the drive sleds.
Once all of the storage devices have been installed, all you have to do is to connect the DS620slim to the network and a power outlet, and then boot it up.
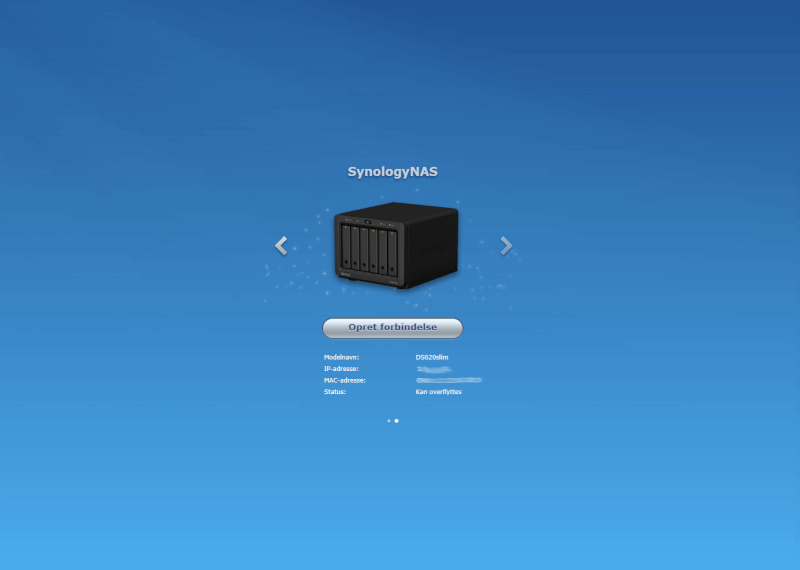
In connection with the setup process, you can download the manufacturer’s DS Finder App to your smartphone, or visit find.synology.com via a PC that is connected to the same network as the DS620slim.
It will then search through the network, and if everything is set up correctly, the new device should appear, and you can then proceed with the configuration of the NAS and Synology DiskStation Manager software.
There’s a step by step guide throughout the whole process, and along the way you are asked to give the new server a name, and to create a login and password, which can be used later.
The Software of Synology DiskStation DS620slim
The software provided with the DS620slim is Synology DiskStation Manager (DSM), which can be accessed via a web interface similar to that of the setup process. It can be done locally, but can also be configured so that it is accessible from outside, using an internet connection and a browser.
Synology also offers apps for both iOS and Android that makes it possible to connect to and control some aspects of the DS620 once it is set up.
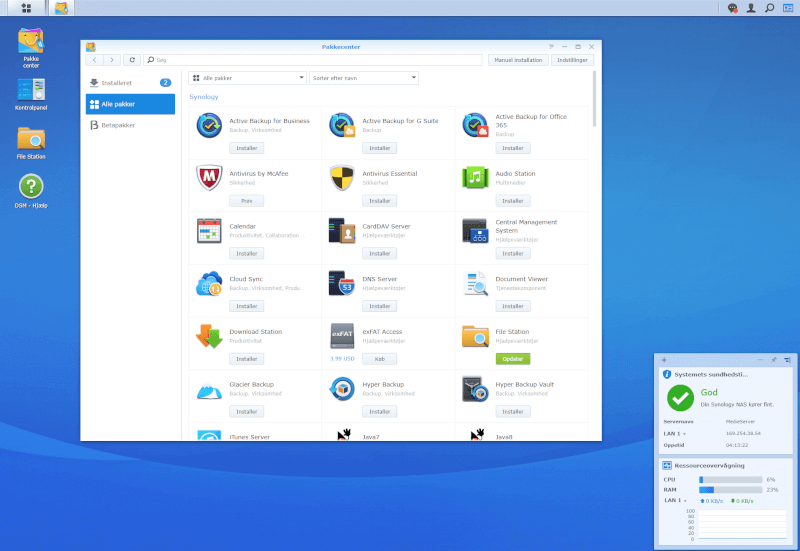
DSM is pretty recognizable, and it most of all looks like a Windows desktop. Most of the options are accessed via the main menu which is located in the top-left corner. From here, you have access to settings and the various apps that you can run on the DS620slim.
It’s also possible to download more apps, based on what needs you have of your NAS, and the ones that you most often use can be dragged to the desktop for easy access.
The hardware of the DS620slim means that you have access to a wide assortment of applications. There’s support of 4K transcoding, so there’s a good foundation for setting up a small media server, and via the Surveillance Station app, it’s possible to use the DS620slim as a server with up to 25 IP cameras.
Synology has also included their Virtual Machine Manager, which makes it possible to run virtual machines based on, for instance, Windows or Linux, and this opens up the possibilities quite substantially.
It would probably be worth it to upgrade the RAM of the machine to the maximum 6 GB, since the aforementioned applications are rather memory demanding.
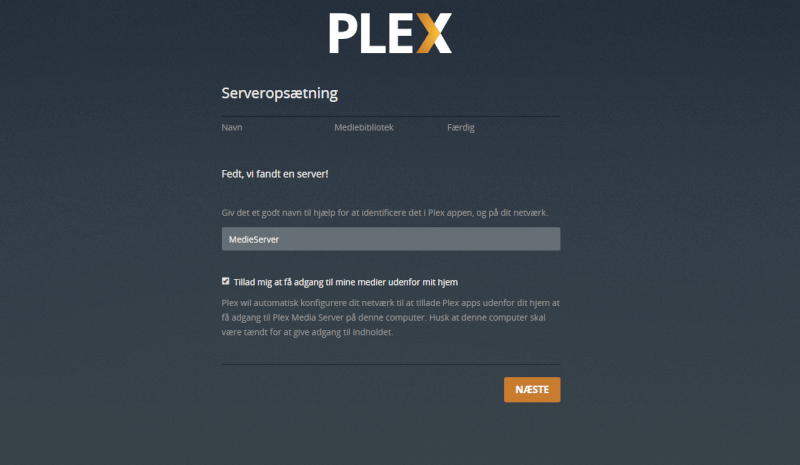
Via Package Center, it’s possible to download a lot of different apps that can be used in conjunction with DSM. Among these, you can get the very popular Plex Media Server, but also security and backup solutions, and local server solutions for mail setup and much more.
DSM is highly accessible and intuitive to use, and should feel familiar for most people that are used to Windows.
There are good options for rookies, but at the same time a lot of powerful options and possibilities for more advanced users.
Testing Synology DiskStation DS620slim
The first time that you open up DSM, you have to configure your storage devices since this is not part of the preliminary setup.
This is done via the storage management menu in the main menu. First, you have to set up your storage device pool, which basically means that you take one or more of your installed storage devices and gather them. It’s during this process that you configure your RAID setup. Which RAID solution is most appropriate for you is up to you to decide. It depends on how you want to balance storage capacity and security.
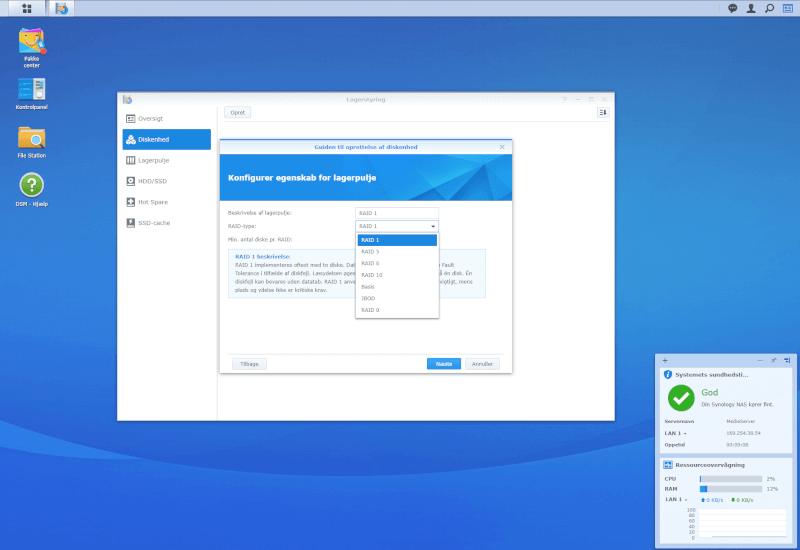
For this test, I decided to go with RAID 10, in order to get a good balance between security and speed. It requires that you have at least four drives since RAID 10 sets up two identical devices and then mirrors them.
This means that I am well protected, if one of my drives should crash. If that were to happen, my data can be restored via the remaining three drives.
This comes at the cost of cutting my overall storage capacity in half, which means that I end up with just under 2 TB of total storage.
If I were to make use of all four mechanical hard drives in my system, it would require that I chose RAID 0 so that all four drives would be combined into a single storage drive that would take advantage of the combined storage capacity of all drives i.e. 4 TB. However, the downside to this solution is that if just one of the drives were to fail, I’d lose all data. So, this is not a sensible approach if you are dealing with important data that you cannot afford to lose.
The options with Synology’s DSM are plentiful, and you can set things up more or less to your liking. So, if I wanted to set up four separate storage volumes of each 1 TB, I could, or one volume of 2 TB in RAID 0 and another volume of 1 TB in RAID 1.
It’s all easily done via the storage management options in DSM, and you can change it continuously, if you so desire. However, you should always remember that if you wish to change the fundamental way that the drives are configured, you should take a backup before proceeding. Always.
SSD Cache
I also configured a SSD cache in my test setup, using the to Kingston SSDs that we got along with the NAS for testing purposes.
An SSD cache can improve the overall performance that you’ll get out of your system since the faster SSDs will reduce the latency involved when using mechanical drives.
As SSD cache configuration offers a good middle ground between an all mechanical hard drives setup, which is slower, and an all SSD setup, which will be much more expensive per GB.
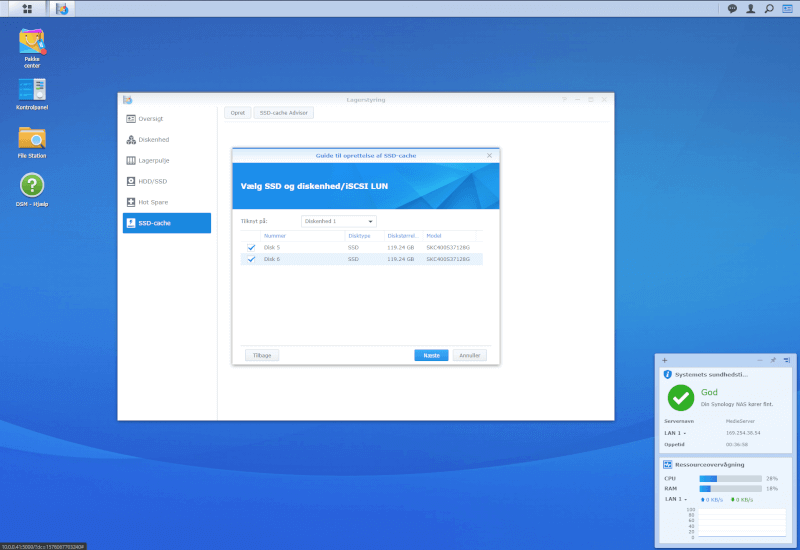
It is important to keep in mind the situations in which an SSD cache will prove useful since it is far from always the case that it will make a difference.
If the primary purpose of your NAS is to keep a backup that you from time to time move chunks of data to, from other devices, then the benefit of setting up an SSD cache is minimal. It also doesn’t make much sense if you are going to use it as a media server from which you stream music or video. If you, on the other hand, are only interested in high speed performance then all you have to do is throw in an SSD in every slot.
The SSD cache becomes very useful when you run programs via your NAS that continuously write or read data. This could for instance be a mail server, databases and other similar things that consistently use data. The DS620slim offers plenty of such options with its many apps that can be installed.
In those cases, the SSD cache will move the most used data chunks to the SDD storage in order to reduce the overall latency.
So, the SSD cache will be beneficial in tasks that require a lot of random read/write actions, and less so in larger and heavier data transfer sessions.
Transfer Speed
The transfer speed to and from a NAS is of course dependent on many outside factors. The speed of the network that the NAS is connected to is the main factor, but also the read and write speeds of the involved hard drives has a role to play. Both the ones installed inside the NAS, but also the ones on the other end that have to send or receive the files.
The LAN ports of the DS620slim are 1 Gbps, which means that the speeds will be at a maximum of 125 MB per second, unless you use the Link Aggregation option, which I didn’t do during my test.
When transferring large folders with files I reached decent and stable transfer speeds at around 111 MB/s, which is about all we can expect from mechanical hard drives on a 1 GbE network. So in that regard the DS620slim did great.
It would’ve been even greater if Synology had implemented a 10 GbE solution on a device such as this, where it would be obvious to install SSDs.
If one were to go ahead and install only SDDs in the DS620slim the network would become a bottleneck, even if you were to use the Link Aggregation option.
Backup
One of the most popular uses of a NAS is to have it serve as a backup of various data such as photos, documents and so on. This way, you are sure to have your things stored in a safe location in case you lose your laptop or a hard drive in your local machine fails.
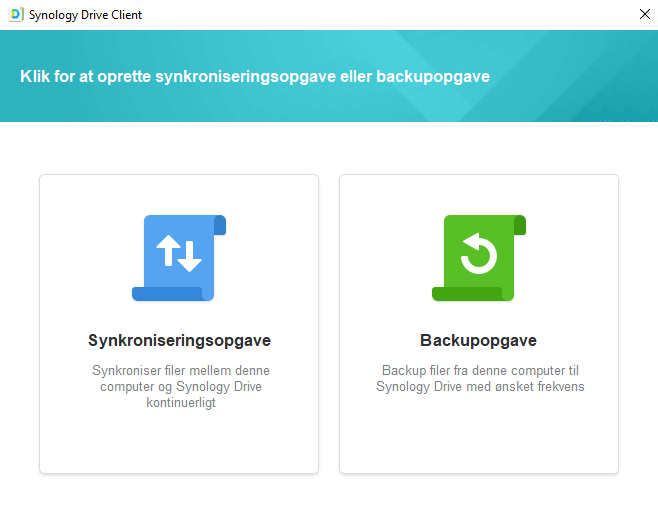
With the DS620slim you also get good support for this. It can be done automatically using various third party programs, or via Synology’s own Drive Client, which can be set up to continuously monitor specific folders or to run scheduled backups.
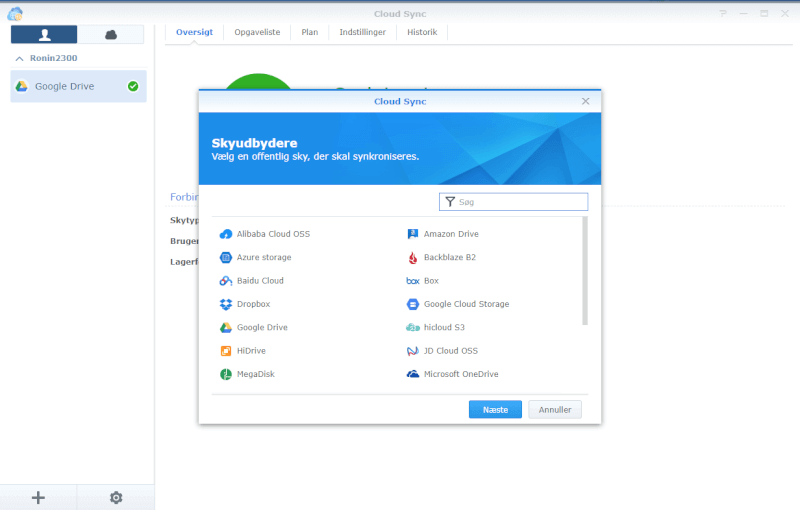
Another really awesome feature that comes with the DS620slim is the extra layer of backup that it is capable of providing. Rather than just backing up data from your PC to the DS620slim, it can also back up specific folders to an additional device. This could for instance be another NAS, located somewhere else, or it could simply be the cloud, for example Google Drive.
This is done via Synology’s Cloud Sync app in DSM. In my setup, I’ve coupled it to my Google Drive account, but a range of other services are also available.
It’s quick and easy to set up and it can be configured as either one-way or two-way synchronization. In my case, I set it up as two-way synchronization of a specific folder. This means that if I add new files to the folder on the DS620slim, then those files are automatically uploaded to the folder on Google Drive. The same applies the other way around, if I add files directly to my Google Drive folder, no matter where I do it from.
The options and the user-friendliness were top notch when I tried out the backup features of the DS620slim, and it’s a great option when it comes to securing your important files.
Media Streaming
The easiest way of streaming media from your DS620slim is via Plex, which can quickly be set up. Once that is done, everything runs via the software and every device that supports Plex will be able to connect to the server. This includes your smartphone, PC and in my case, my Nvidia Shield, which I have connected to my TV and stereo in my living room.
The hardware of the DS620slim should be more than enough to handle all types of media content that you might throw at it.
Noise
There’s one important thing that will most likely matter quite a lot for most people and that is the noise level. Especially if you plan on having the NAS turned on daily, or maybe even 24/7. If you use mechanical hard drives there’s no way around it. There will be some level of noise coming from the NAS.
The DS620slim is by no means quiet, and it will be noticeable if you are close to it. However, the noise is held at a reasonable level, and is best characterized as a light humming. I measured the noise level to around 38-39 dB at a distance of 40 cm from the front of it.
At no point did I notice the fan on the back over the noise from the installed hard drives.
If you wish to have a completely silent device you could also opt for only SSDs.
Price
At the time of this writing, the DS620slim is available online at the price of $451.99, and keep in mind that this is without any storage devices. Those, you have to buy separately. If you were to set the storage up similarly to what we’ve done in this review, it will cost you roughly an additional $475. So, a total of around $930.
It’s certainly not a cheap investment, but if you consider all the things that you get, it’s quite reasonable. A normal-sized 6-bay NAS device for 3.5-inch drives will easily cost more. The advantage, though, is that you can save a bit of money when buying only 3.5-inch drives since they are cheaper per GB compared to the 2.5-inch versions.
Conclusion
Synology DS620slim is a really nice and powerful NAS device, which even sports a small and compact size.
With room for up to six 2.5-inch storage devices and the option of dedicating two of these as SSD cache there are good options readily available for those of you who are in the market for a small and compact NAS.
The disadvantage, though, is that you are somewhat restricted in terms of storage capacity with the smaller 2.5-inch drives, both with mechanical hard drives and SSDs, which are only available in limited sizes compared to the beefier 3.5-inch drives that are often cheaper too.
So, this is something that is important to keep in mind before buying the DS620slim. You might run into capacity concerns if you have large quantities of data to store.
However, if this is not an issue for you then the DS620slim will offer you a lot of useful options. Despite its small footprint it packs some powerful hardware, and the Synology DSM operating system is robust, easily accessible and offers a wide range of apps that allows you to use the DS620slim in many ways.
I’ve only been able to scratch the surface during my test. So I haven’t tried out everything.
Synology DS620slim provides a very good foundation for anyone that is in need of a NAS device and who might favor the small size. The option of Dual LAN with Link Aggregation and the SSDs will be useful for those of you who seek high network connected transfer speeds.
One thing that I would have liked to see is a 10 GbE solution so that your network speed won’t limit you, if you opt for an all SSD solution.
It was a pleasure setting up and working with the DSM operating system, and the small physical size of the NAS meant that it could easily by stowed away in a cupboard or on a shelf.
The price might be on the heavy side when you also include the price of storage devices. However, given the hardware that you get, along with the options you have with the small DS620slim, the price is quite reasonable.
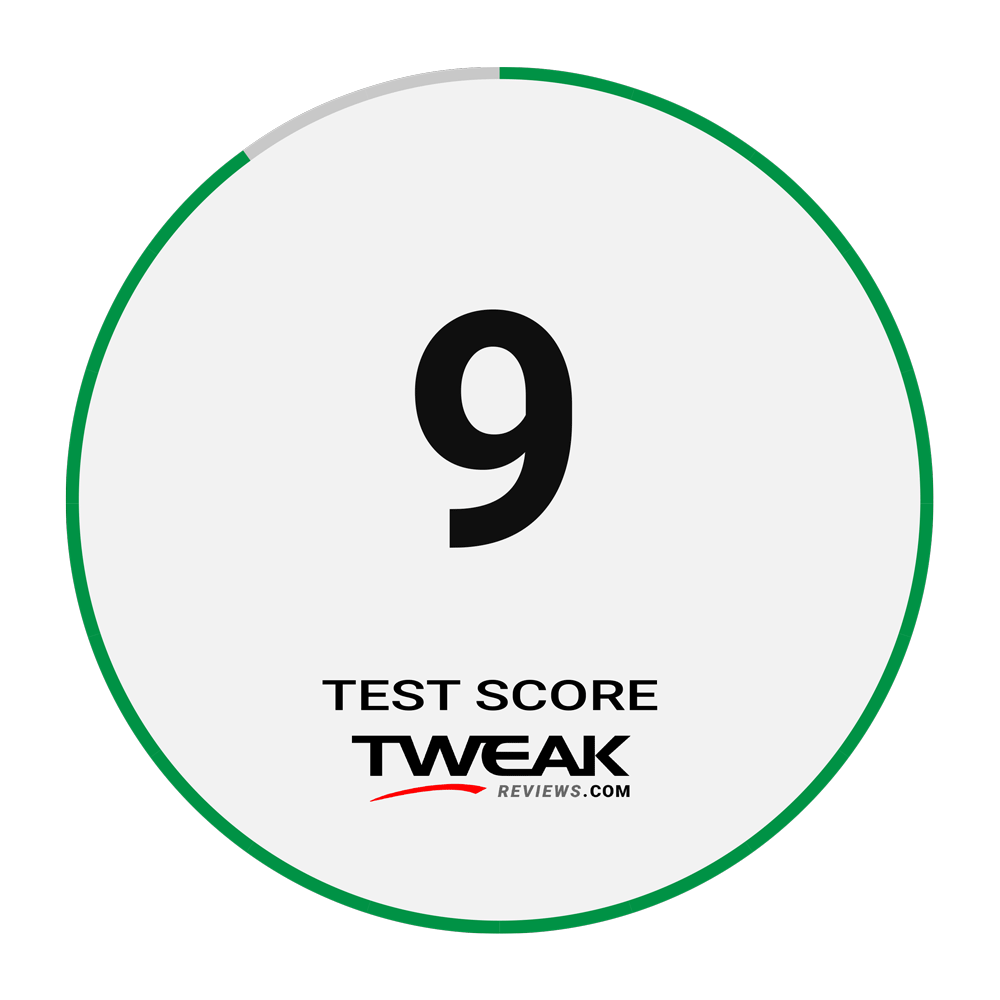
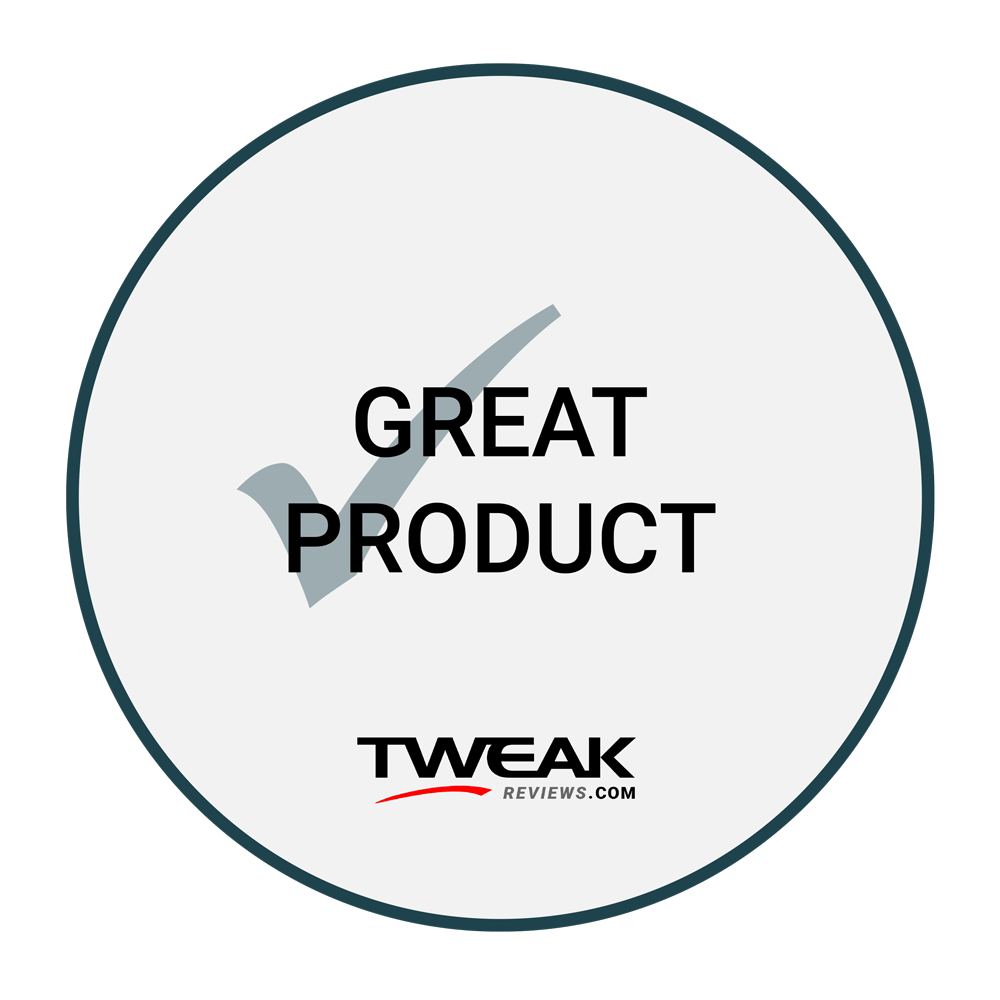
We arrive at a final score of 9 and our Great Product Award for a product that is easily accessible for newcomers, but still offers a host of features and options that are targeted at the more advanced and demanding users.
Pros:
Powerful hardware
Really good software
Small and nice device
Cons:
No 10 GbE