27 May
printer


Central Features
We've got the Bambu Lab A1 printer over with the included AMS Lite unit, which allows you to automatically print with several different colors.
If you are more curious about why Bambu Lab has made an updated version of the A1 Printer, you can read our article about it right here.
A tour around Bambu Lab A1
Unlike its little brother the A1 Mini, the A1 printer does not come assembled, so getting started requires a bit of work.
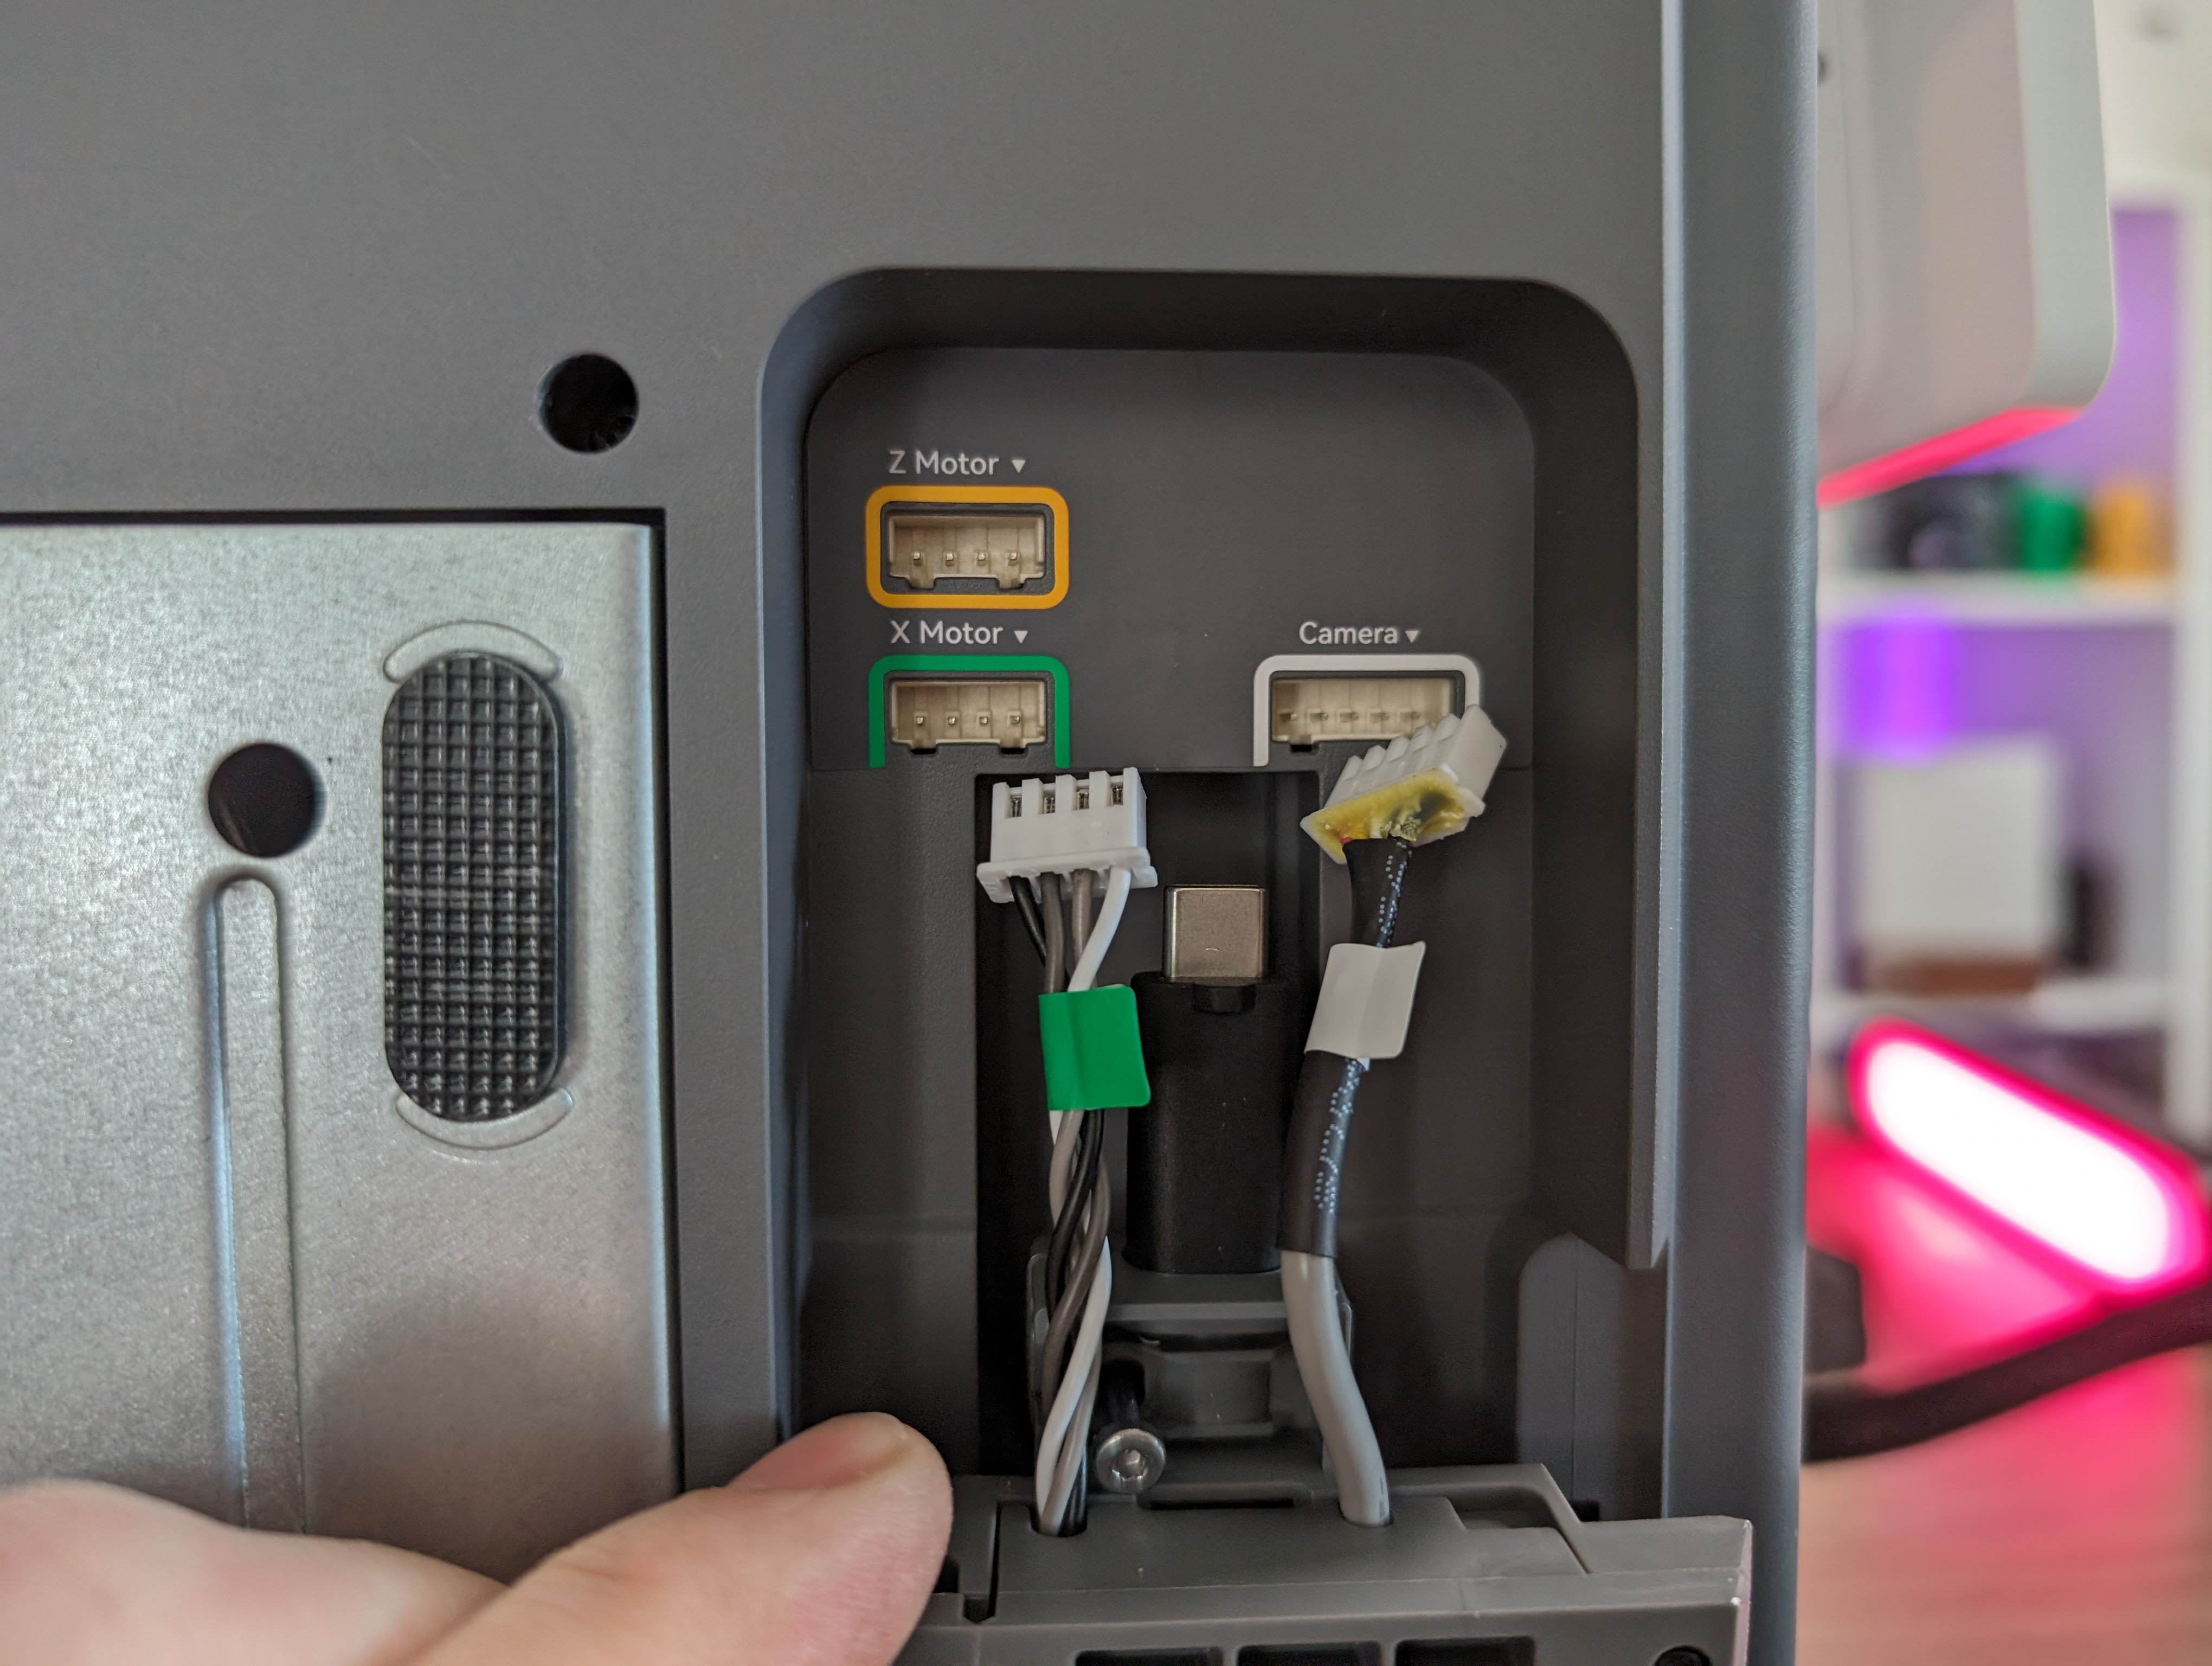
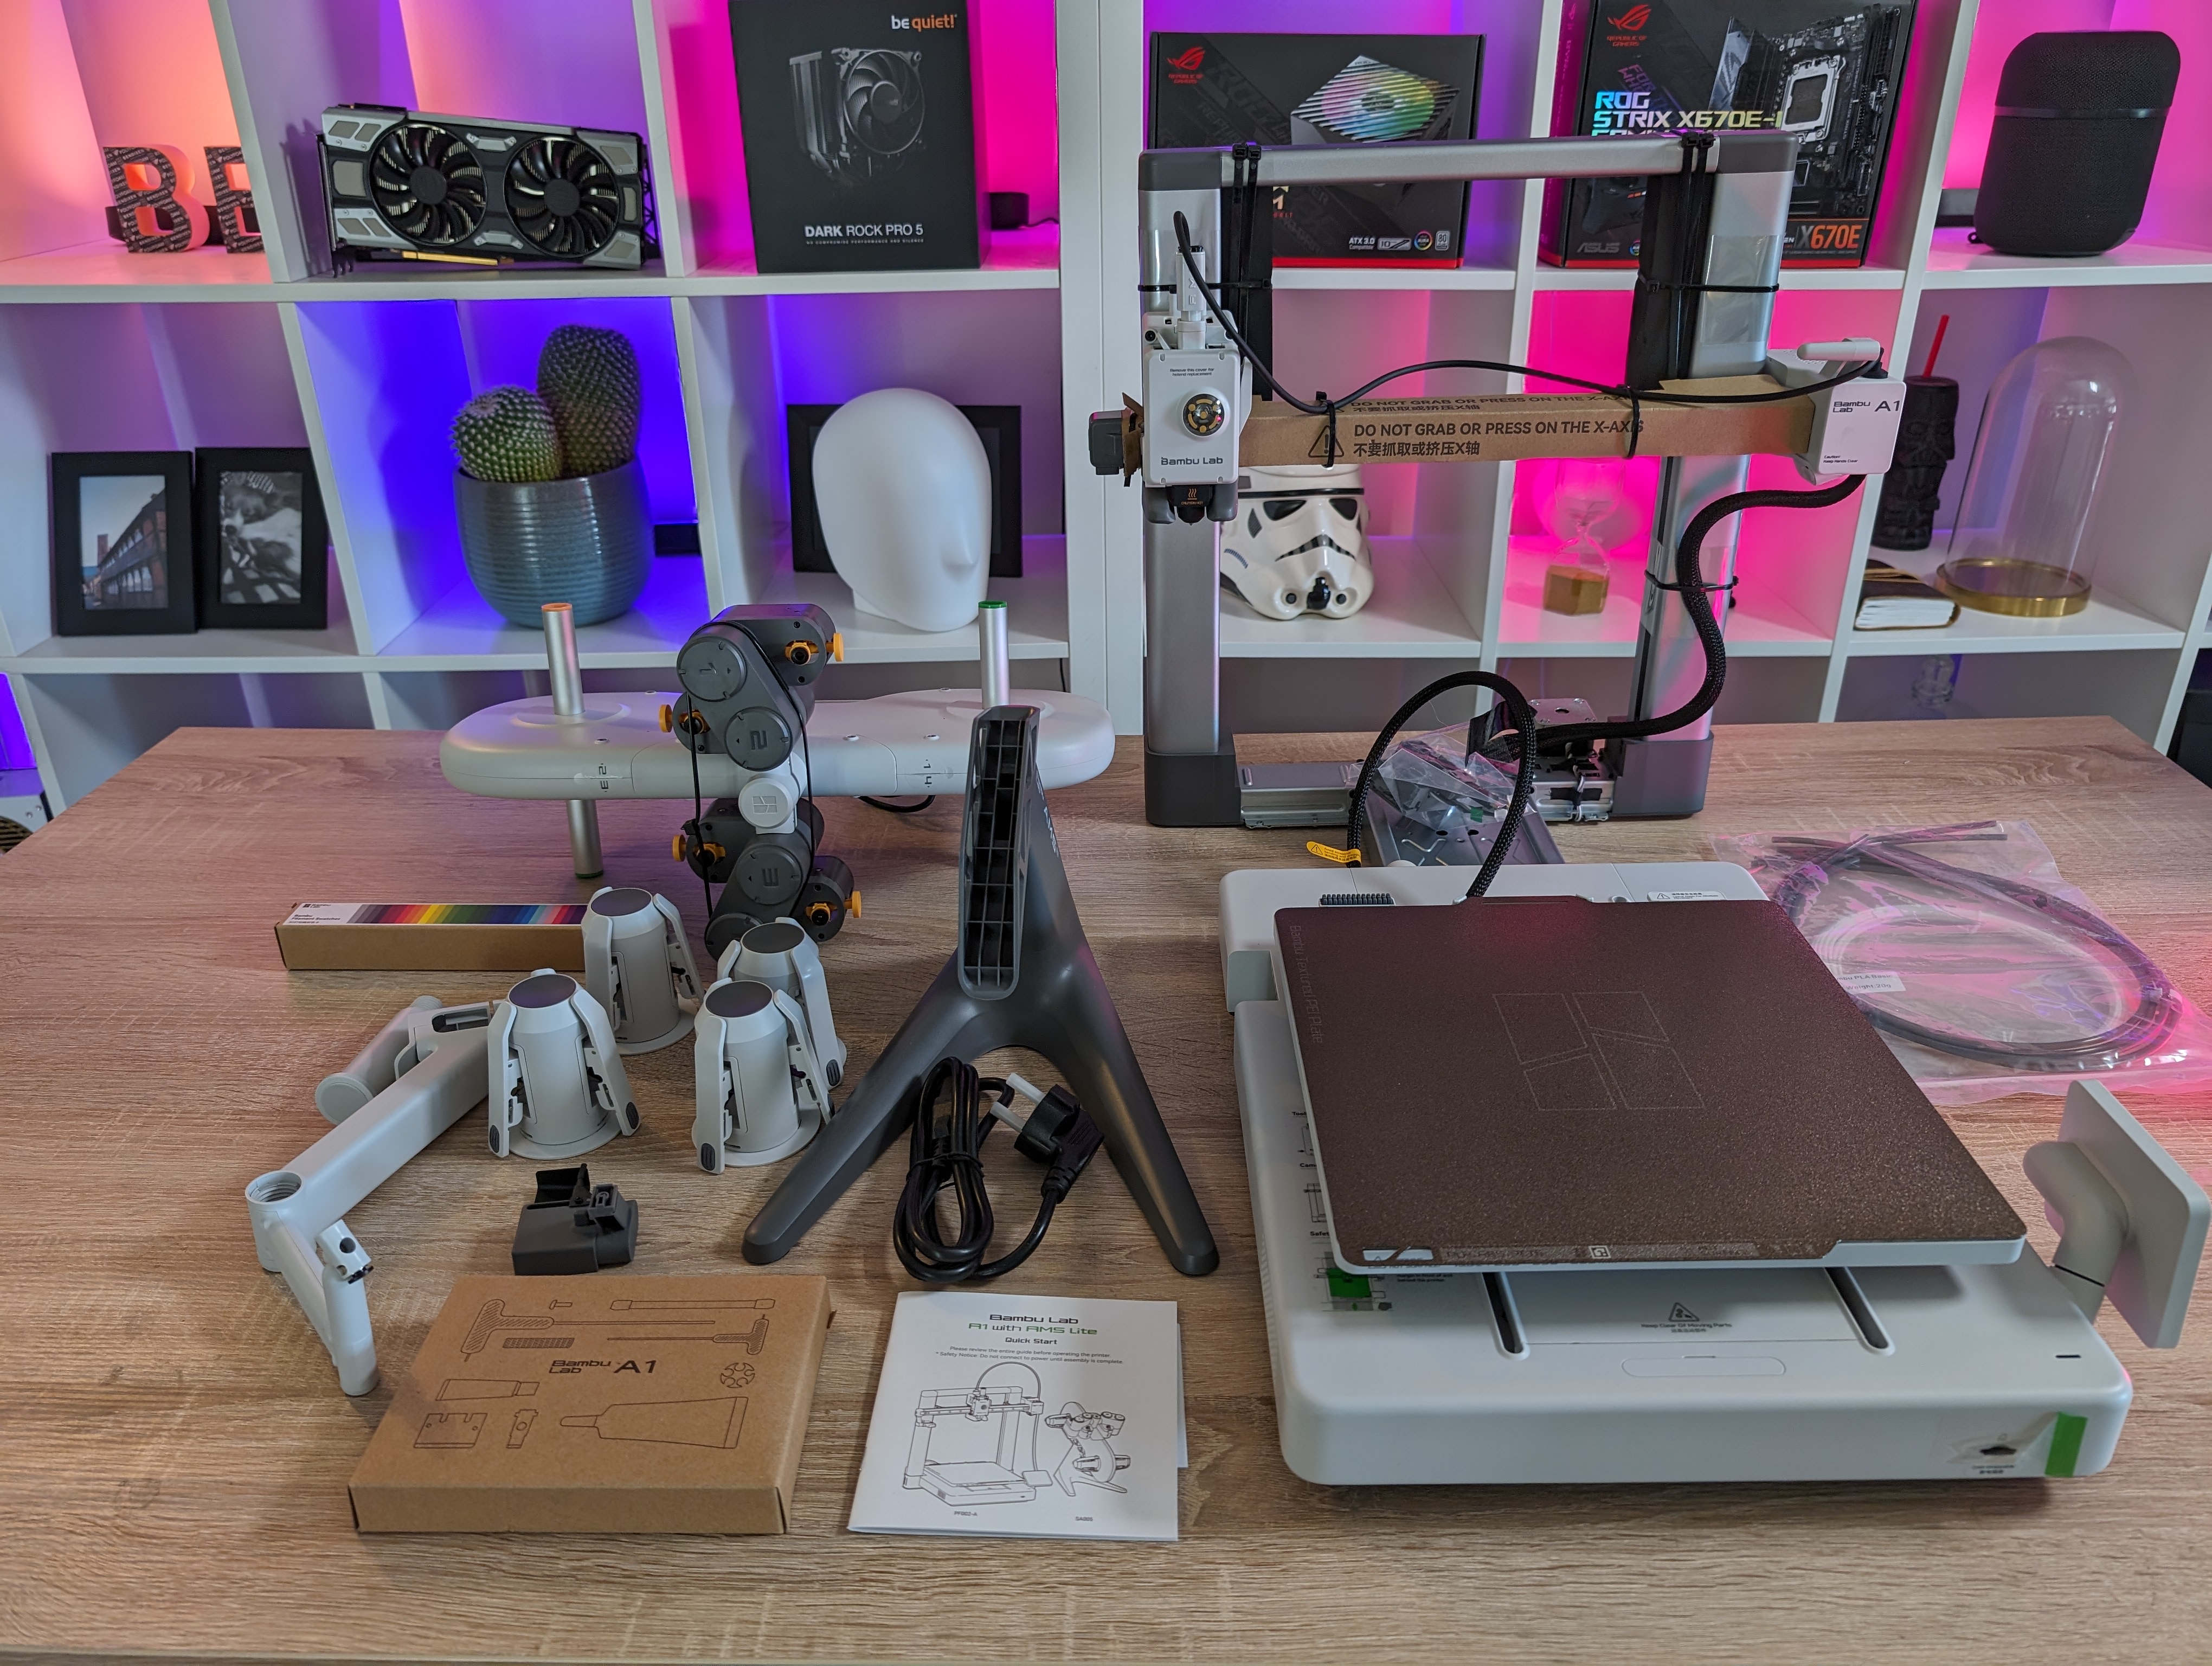 However, it is a process that Bambu Lab has made quite easy with clear instructions in the manual along with clearly marked screws, accessories and cables. A combination of color codes and markings means that it is easy to see what needs to be used or connected and where it needs to be done.
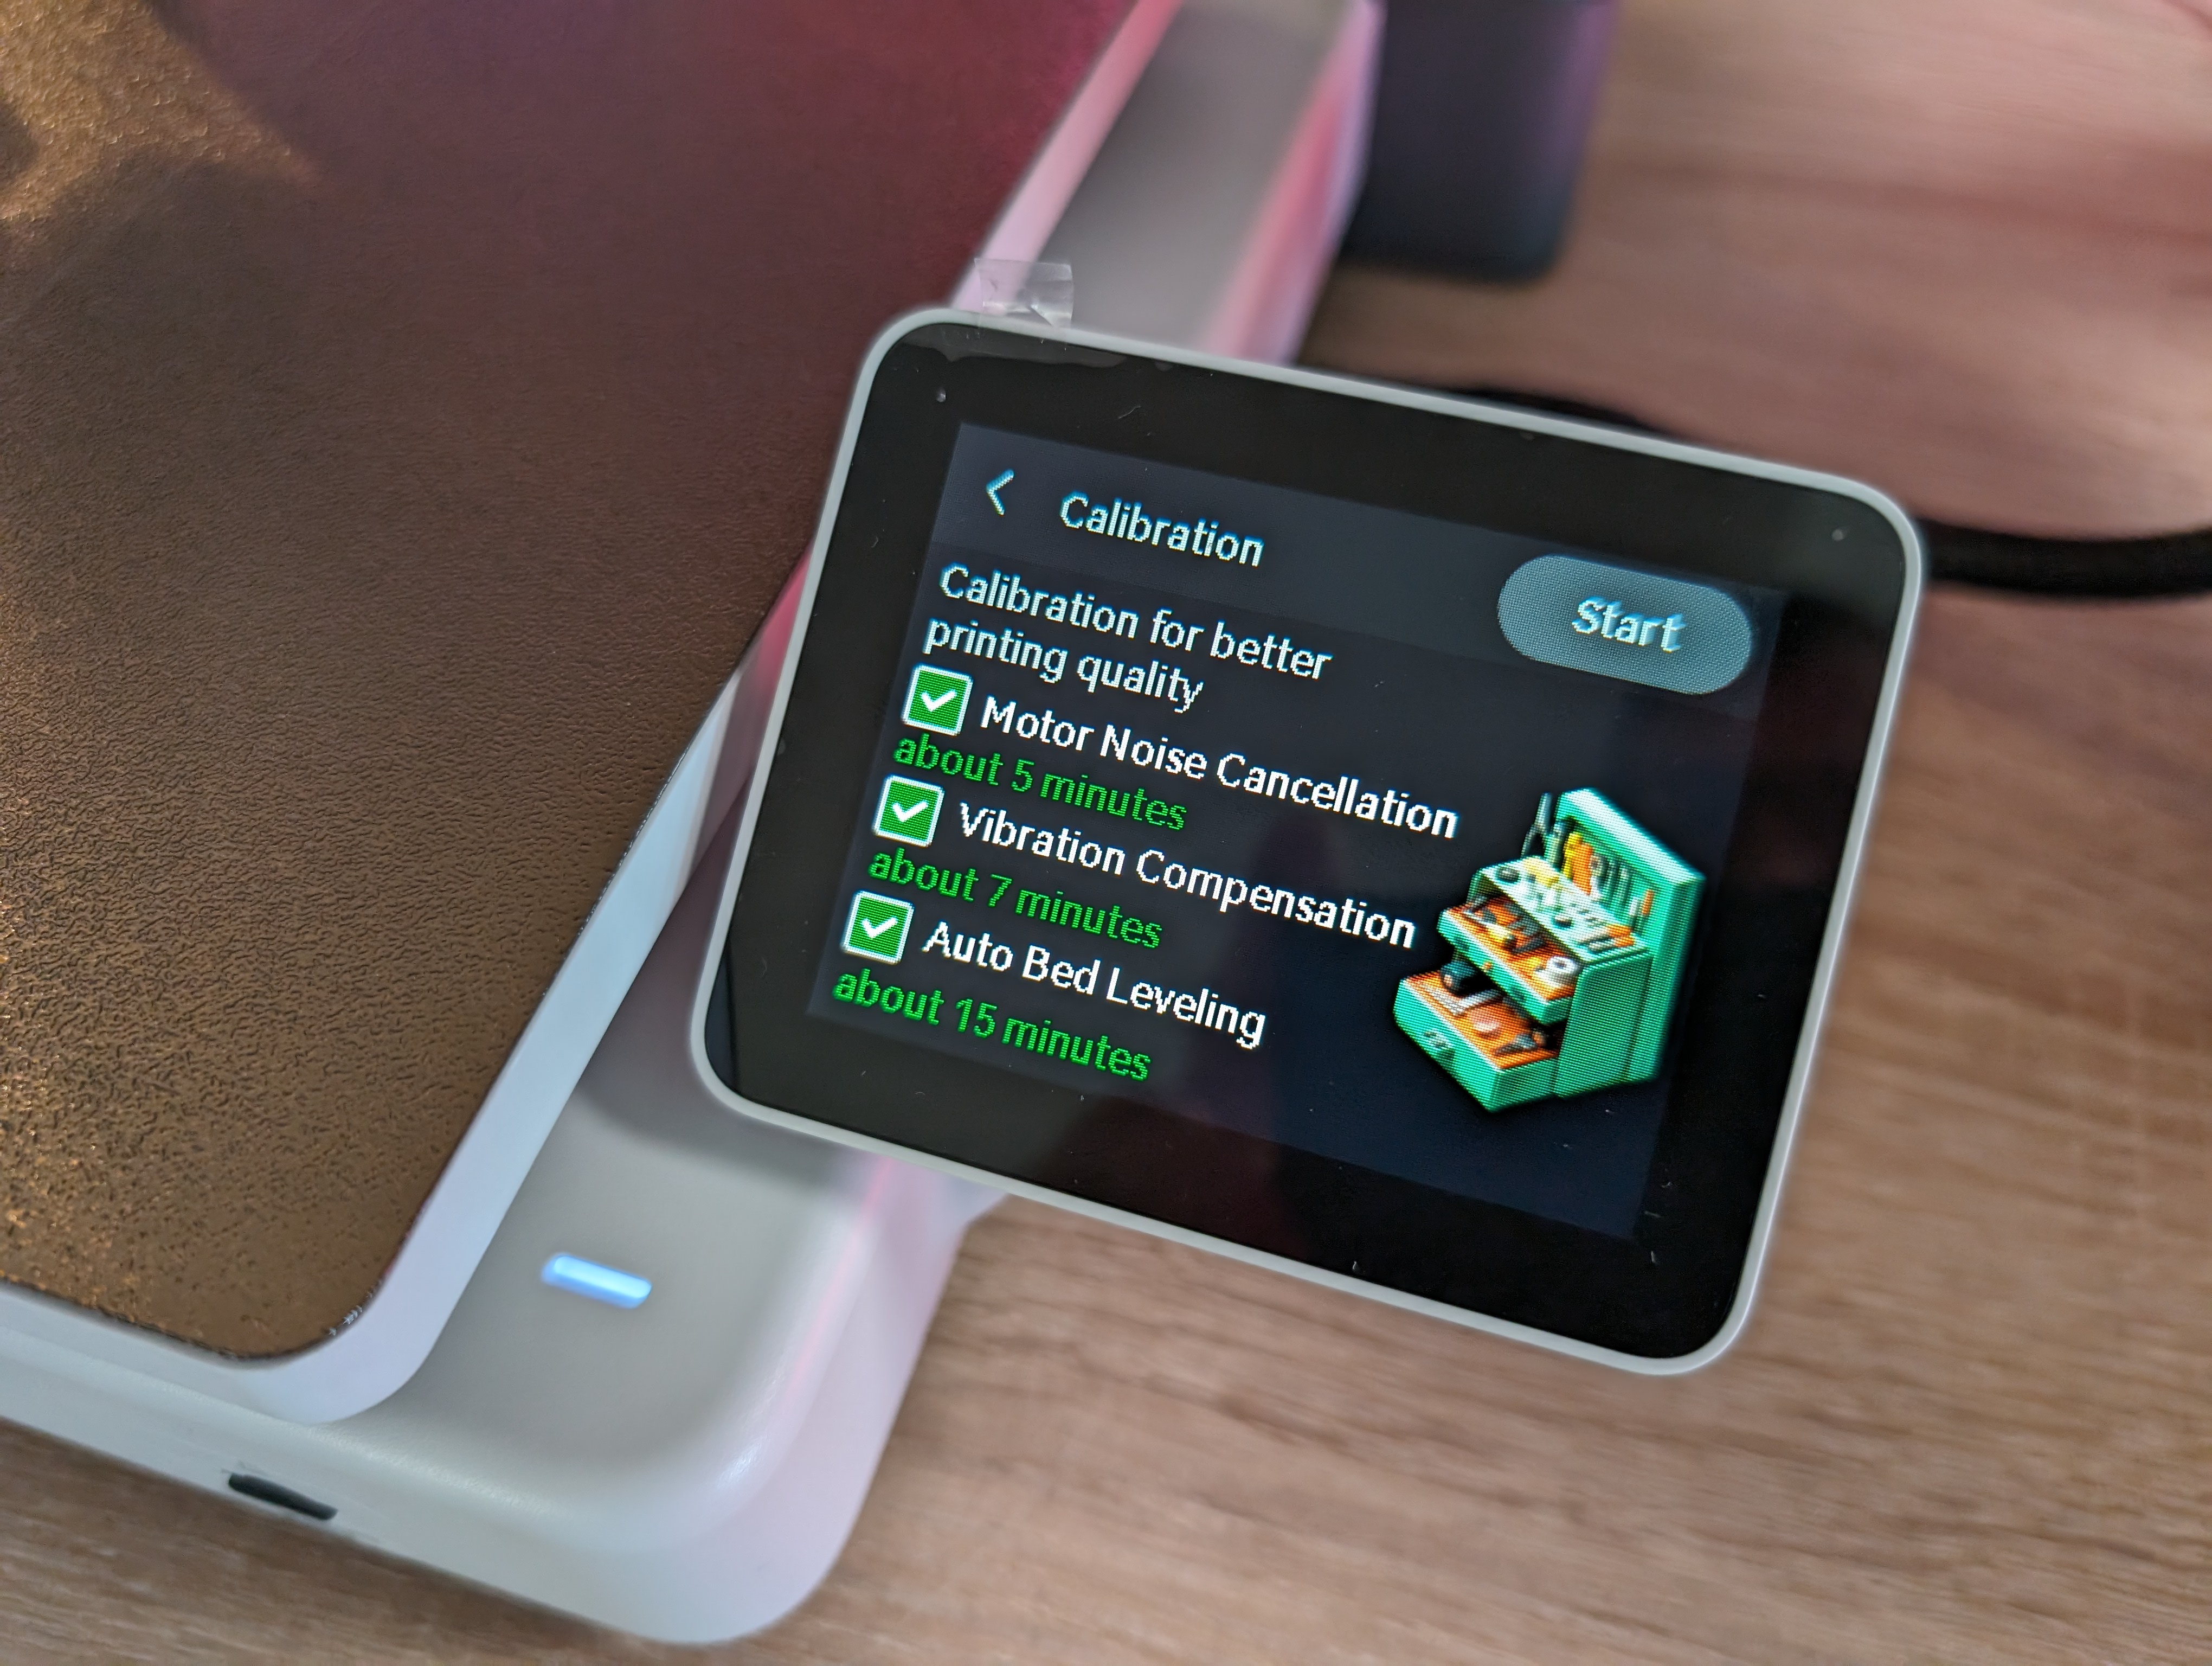
I had the A1 printer assembled after about 40 minutes of work. From here you can connect to the printer via the Bambu handy app, and then the printer automatically runs a calibration and adjustment.
When all that is in place, you are ready to get started.
Physically, there are many similarities between the A1 and the A1 Mini, which we have already looked at. The main difference is of course the size, where the A1 comes with a build volume of 256*256*256 mm³.
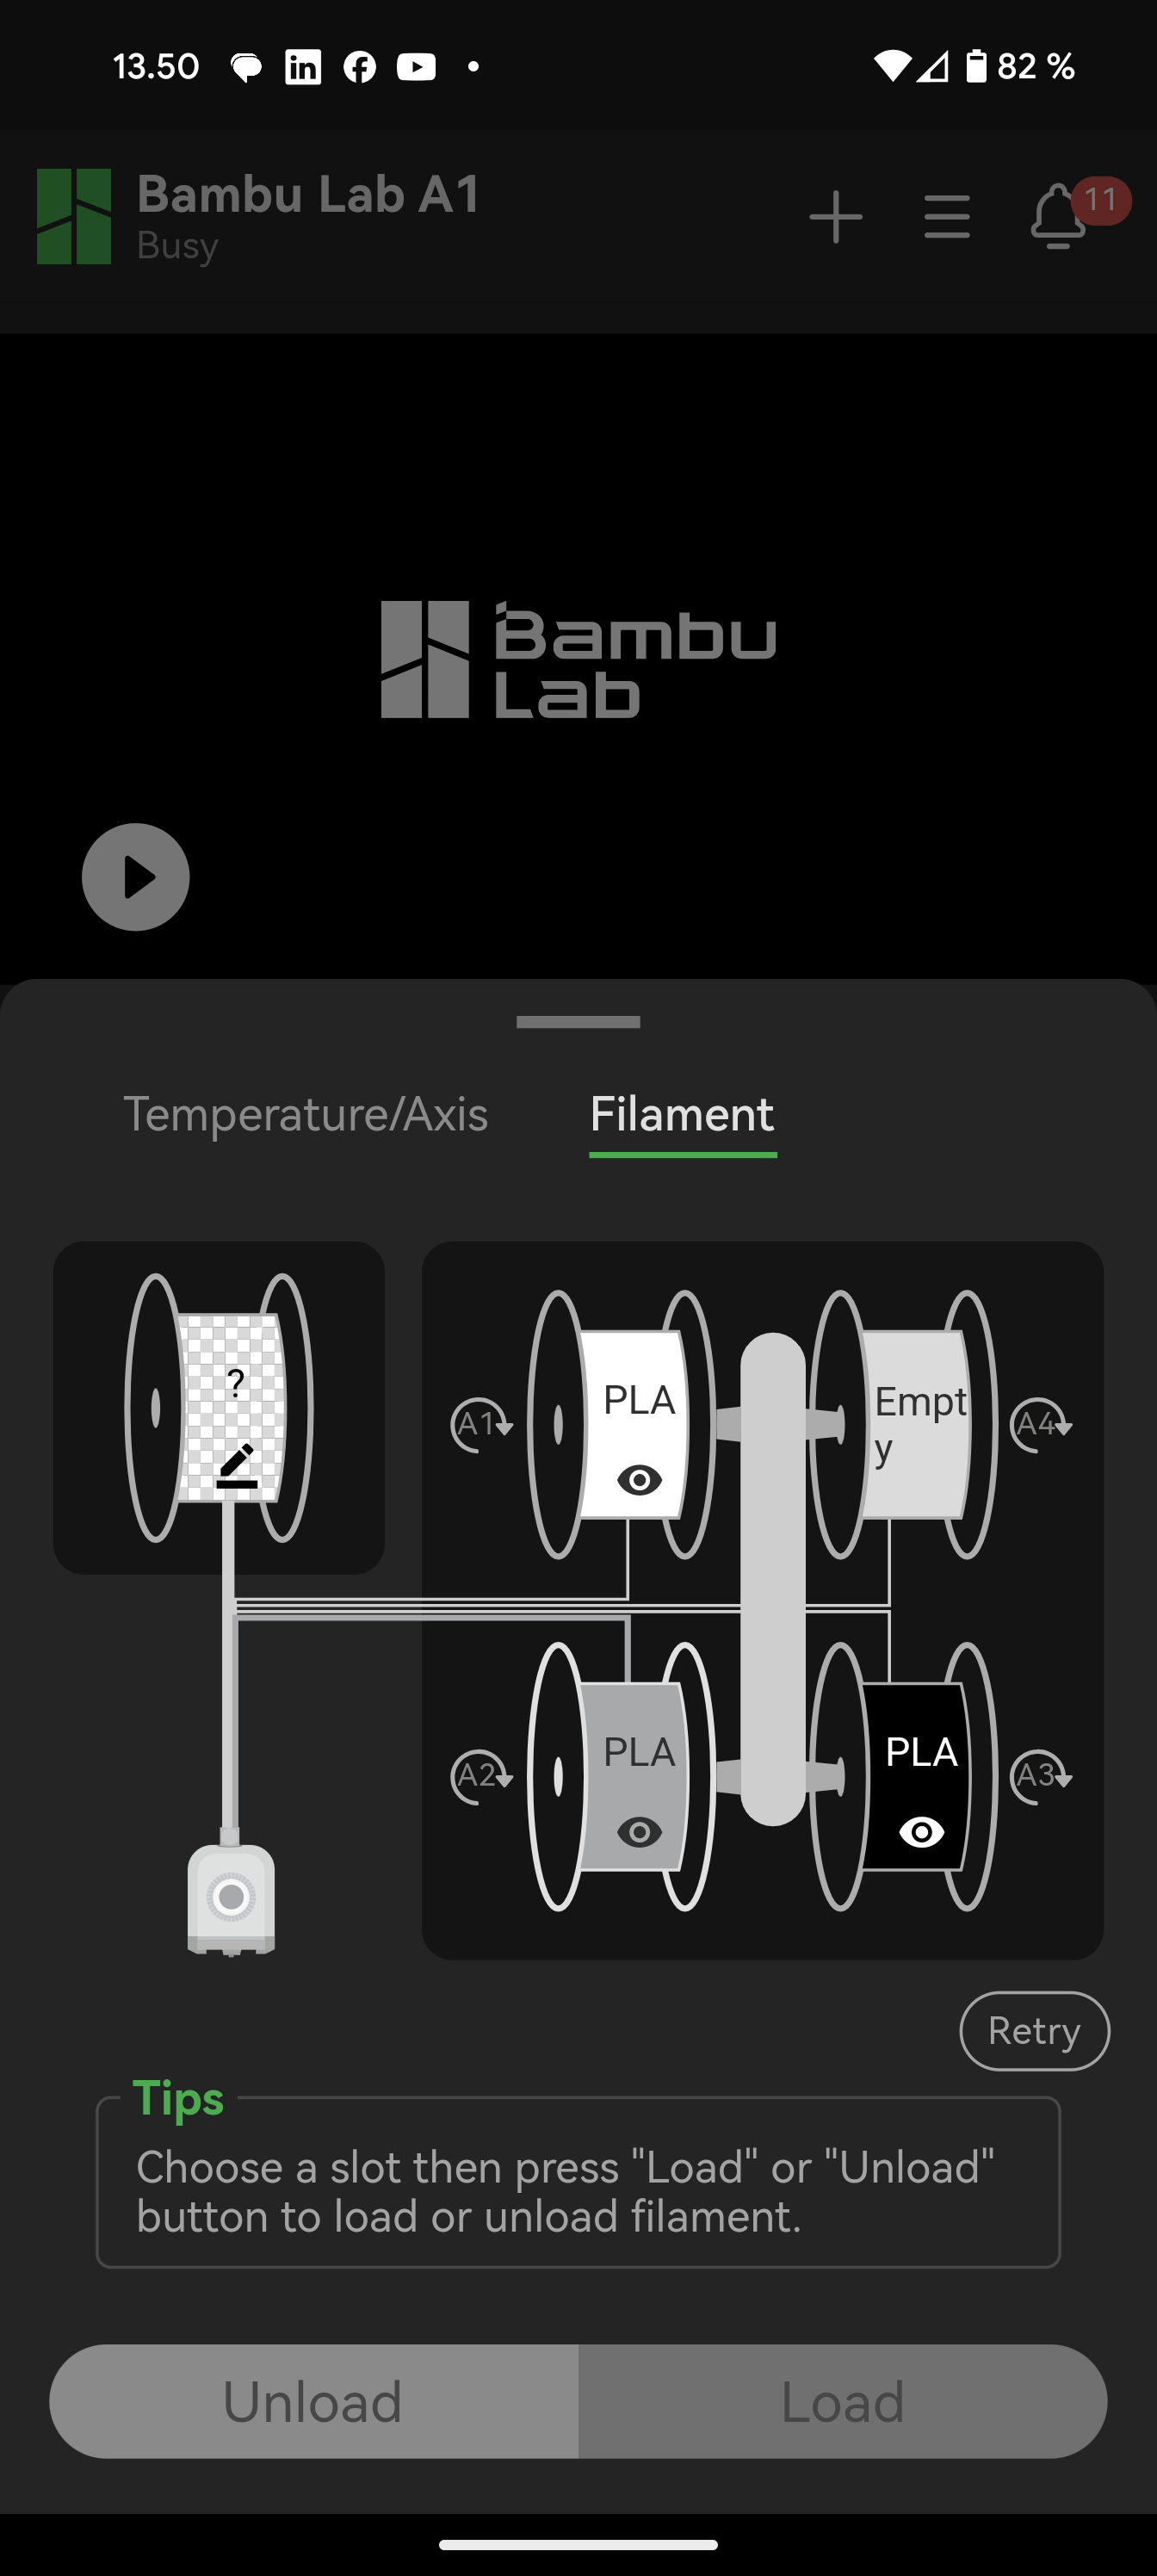
The AMS Lite unit that comes with our Combo version is the same type that the A1 Mini uses. The AMS Lite unit has space for four rolls of filament, all of which are sent through PTFE tubes to the printer.
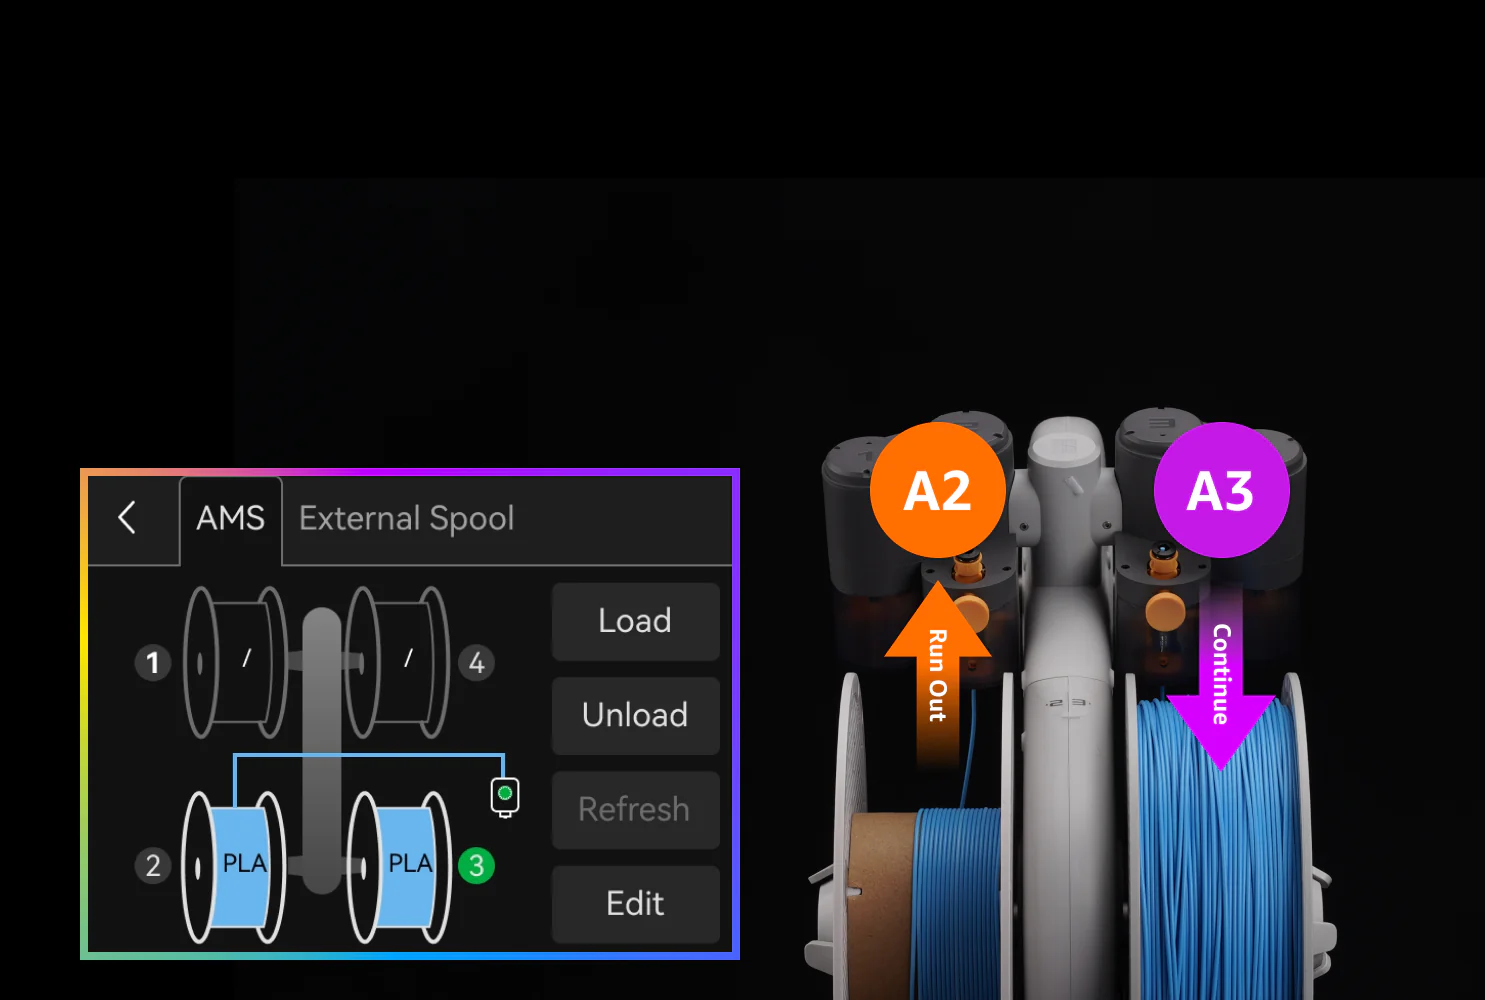
The AMS Lite unit is connected to power via a plug that is inserted into the printer and from here the two are also connected so that they can talk to each other.
The AMS unit is optimized to use Bambu Lab's own filament. It is of course possible to use third-party filament, but if you want all the benefits, then you must use Bambu Lab's own filament.
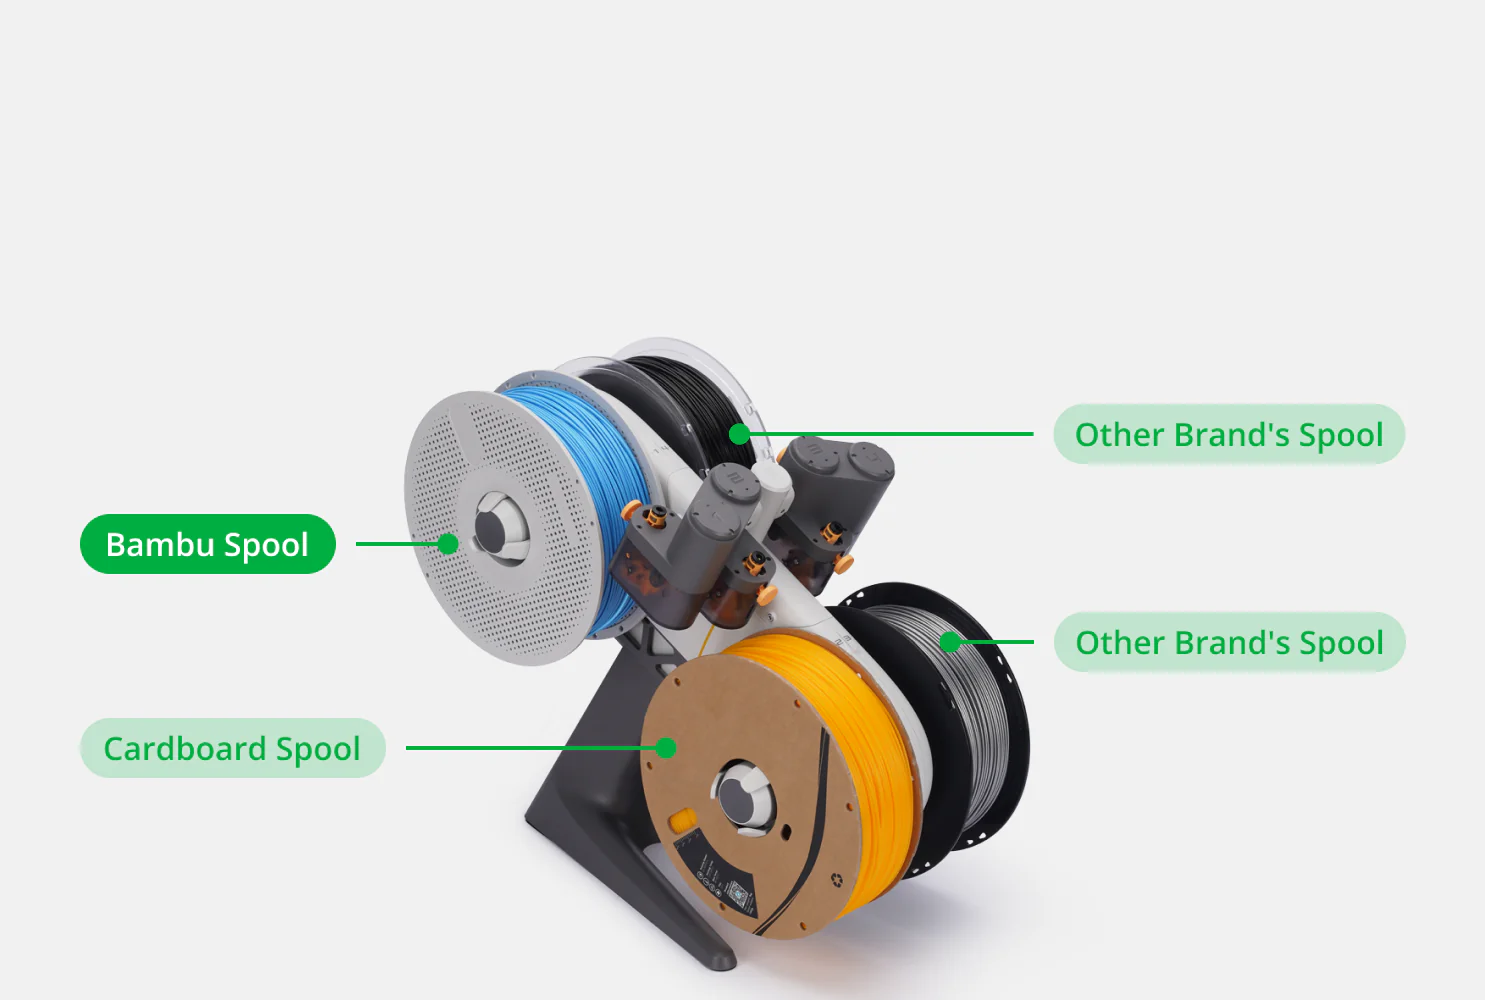
Each roll has a small RFID chip, so the AMS Lite device and the printer know what type of material and color it is. In this way, the printer and the software can automatically use the optimized print profiles from Bambu Lab for the right material.
If you have a selection of colors and material types you like, you can buy refills so that you can reuse the plastic rolls with RFID over and over again.
A1 can work with PLA, PETG, TPU and PVA within what Bambu Lab itself calls "Ideal". ABS, ASA, PC, PA, PET and Carbon/Glass Fiber Reinforced Polymer are also mentioned, but are listed by Bambu Lab as supported but not recommended.
Bambu Lab A1 is a 3D Printer of the "bedslinger" type. This means that the print platform at the bottom moves back and forth on the Y axis, while the print head is responsible for the movements to the sides on the X axis and up and down on the Z axis.

It is a flexible PEI buildplate which mounts magnetically on the A1. It has a textured surface that should ensure that the print is firmly attached while printing without the need for additional measures. It can be turned so that both sides can be used if you have a need or get damage on one side. However, Bambu Lab also sells other plates which are better for certain types of prints and materials.
Very practical, Bambu Lab has ensured that there are small protrusions on the plate, which fit correspondingly on the printer itself, so that the flexible build plate is super easy to line up with its place on the printer.
Input on the printer itself can be handled via the small 2.4" touch display on the front right corner. On the side we find connectors for AMS connection and on the front a MicroSD card reader, which is used to get the files onto the printer.
To begin with, I was a little disappointed with that choice, but the A1 also comes with built-in WiFi and good software integration, which means you can easily send files wirelessly. This meant that I almost never had the SD card out of the machine, which I will get into in more detail later in the test.
The A1 uses a Direct Extruder motor, which is assembled in the print head together with the Print Nozzle and sensors.
On the front of the print head there is a small indicator which can be used to keep an eye on the motor's progress. It is also behind this panel that you find Bambu Labs hotends, which are a small stroke of genius in themselves.
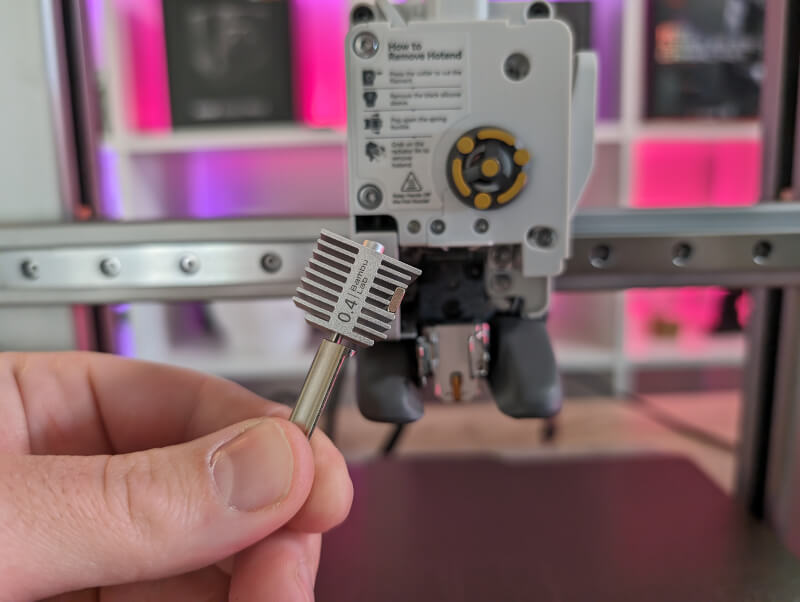
Here, Bambu Lab has made sure to make things as easily accessible and plug and play as the rest of the printer. The entire hotend section is easy to remove without the need for tools and can be changed in less than a minute.
It is magnetically held in place and locked in place with a clamp mechanism. It is a solution that makes most other manufacturers' solutions seem incredibly difficult and old-fashioned.
A 0.4 mm hotend is included with the printer, but Bambu Lab also sells kits with 0.2, 0.6 or 0.8 if you want to switch out for specific tasks. However, you should be aware that they are available in both a hardened steel and a stainless steel version, depending on which tasks and filament types you want to use, which one you should choose can vary. However, Bambu Lab has a nice overview on their website in relation to their own filament types.
Another nice little detail that Bambu Lab has included is a built-in camera. Via the small camera, you can monitor your prints or let the system record an automatic timelapse of your prints. It's nice to have that little feature, because even though the camera certainly doesn't win awards for its quality, it offers a lot of practical possibilities in conjunction with the software.
Before I finish the physical review, I will also go over the extra things that came with the A1 printer. Among other things, it was a collection of color and material samples of the entire Bambu Lab range of filaments. It was a small box with square printed pieces of the different colors and materials.
It was a nice little addition, so you have the opportunity to see with your own eyes how the different materials look.
Also included in the box were parts for a scraper to clean off your build plate. However, as with many other printers, it was not the whole scraper, but instead, as I said, just the parts for it. You can then print the rest yourself and collect them with the files included on the MicroSD card that is in the machine.
Software
On this front, there is not much difference from my experience with the A1 Mini. So if you've read that review this chapter will sound familiar.
On the software side, you can use both the Bambu Handy app and the Bambu Studio slicer on your PC. You can of course also use other slicer software such as Orka Slicer etc. For the test here, however, I have stuck to the Bambu Handy app and the Bambu Studio slicer
If we start with the app, which we have already covered briefly in connection with the setup, it works on the one hand as an easy way to monitor one's printer.
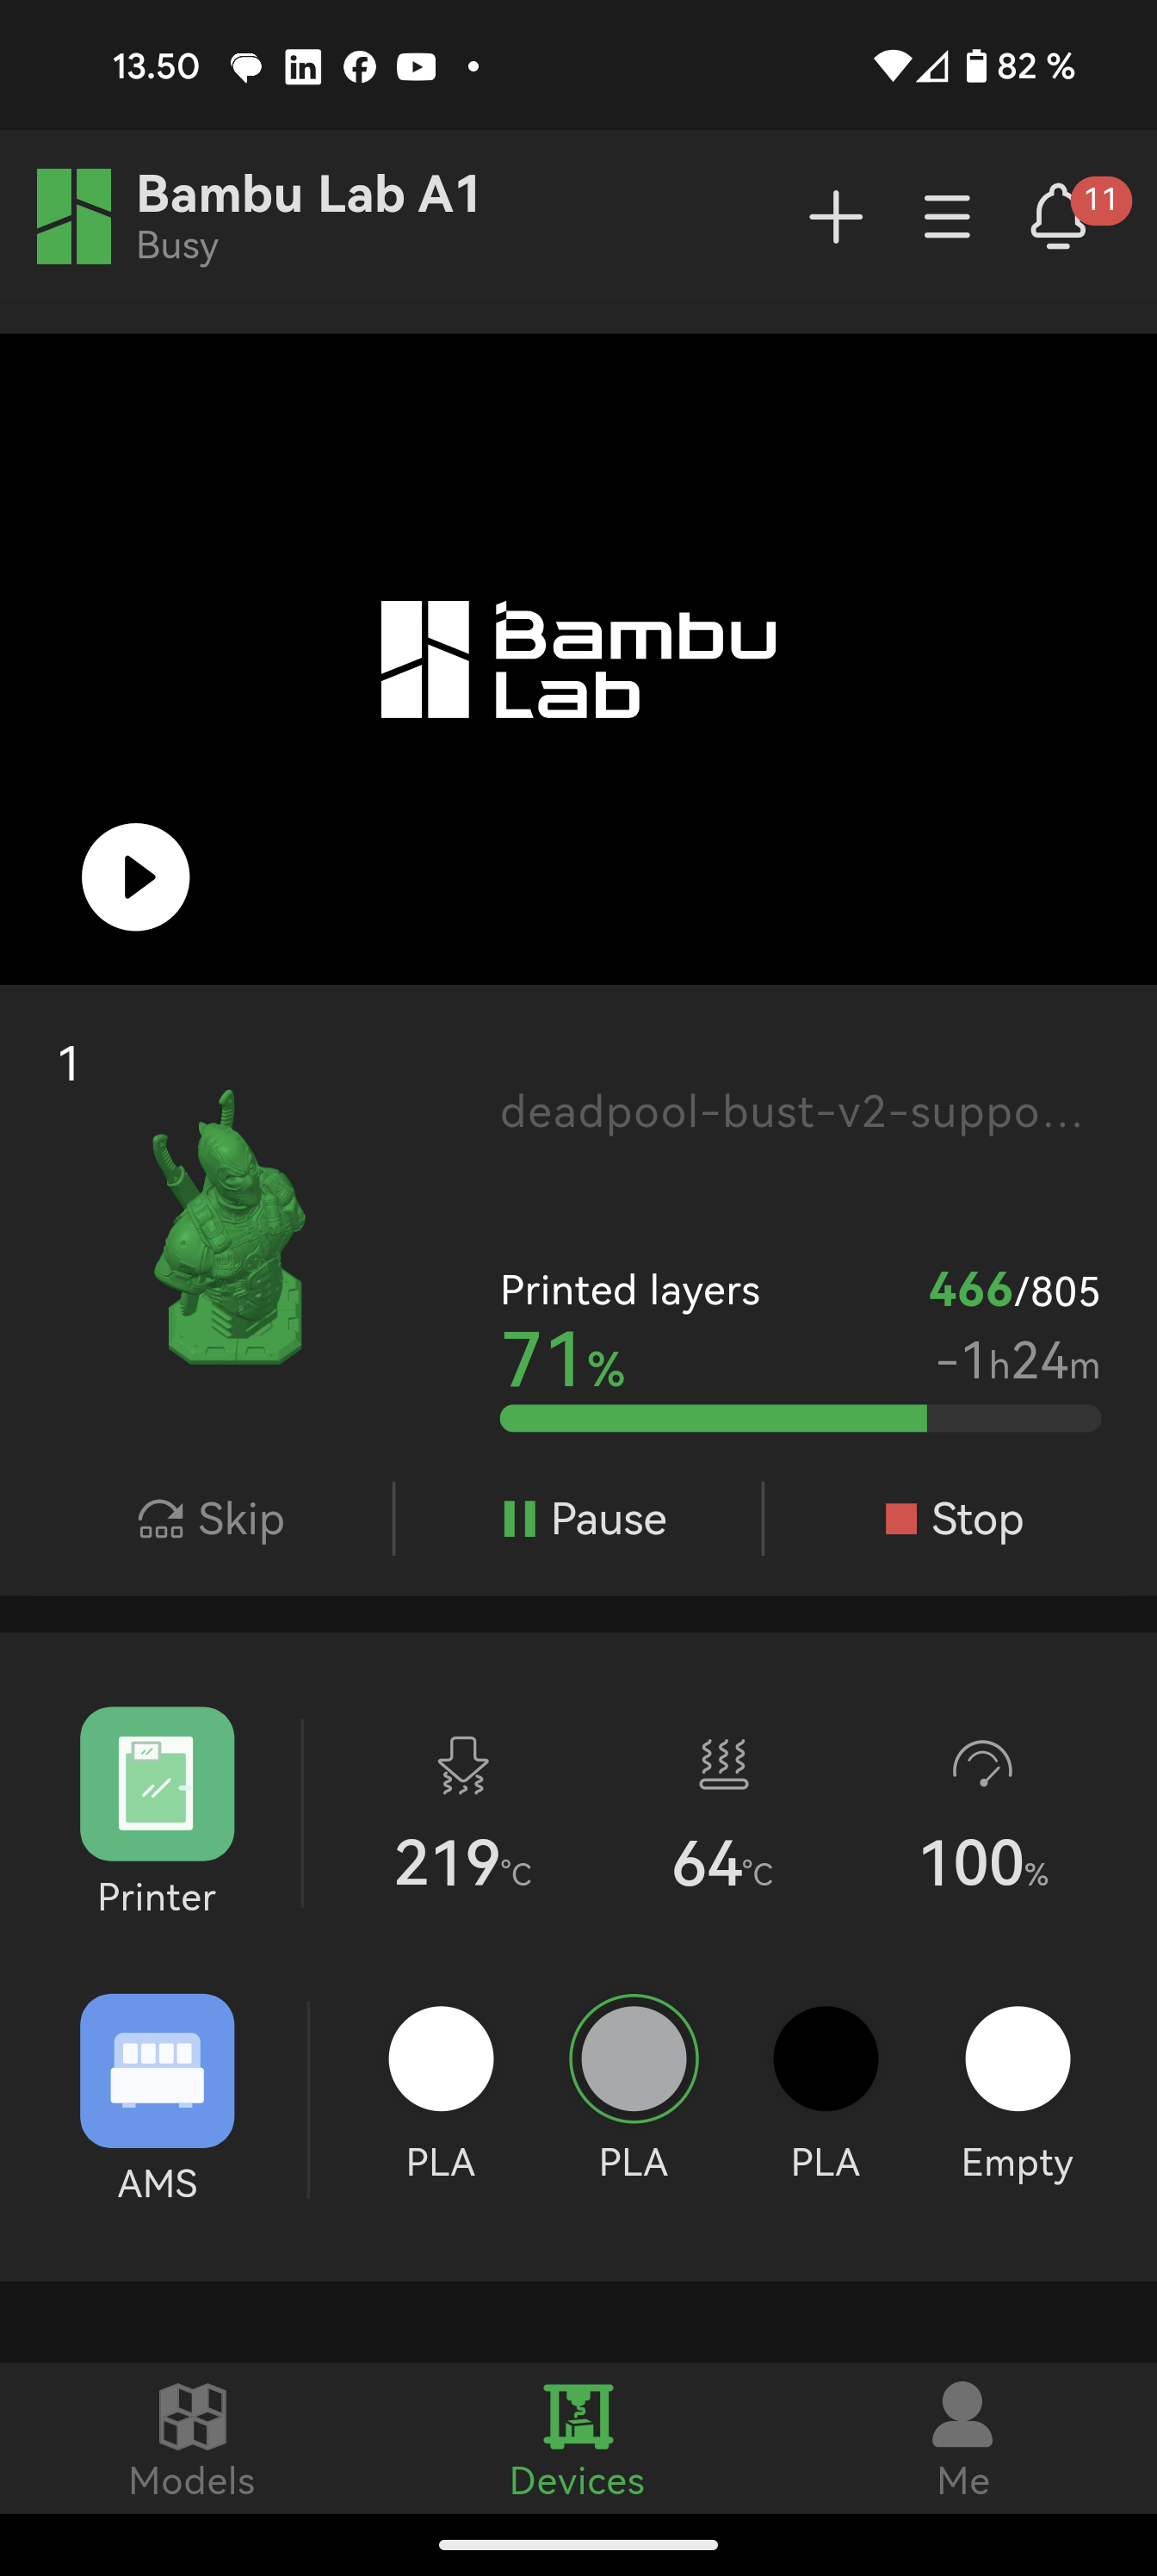
You can open the app at any time and check the progress of the print you have running. You even get a notification on your phone when a print is finished. So if you print a lot, it is a good way to optimize time.
Via the app, you can see how far your print is and see the temperature of both the hotend and printbed. You can even access the built-in camera and see if everything is working as it should.
If you have an AMS Lite connected, you can also see which materials and colors you have mounted on the four places.
The other side of the Bambu Handy app is as a source of files to print. There is a sea of files in a multitude of different categories with everything from toys and wacky figures to practical prints of all shades.
If there are any of the many models that require payment, I have not been able to find them, and this means that you already have a huge library of files to get on board when the printer is unpacked.
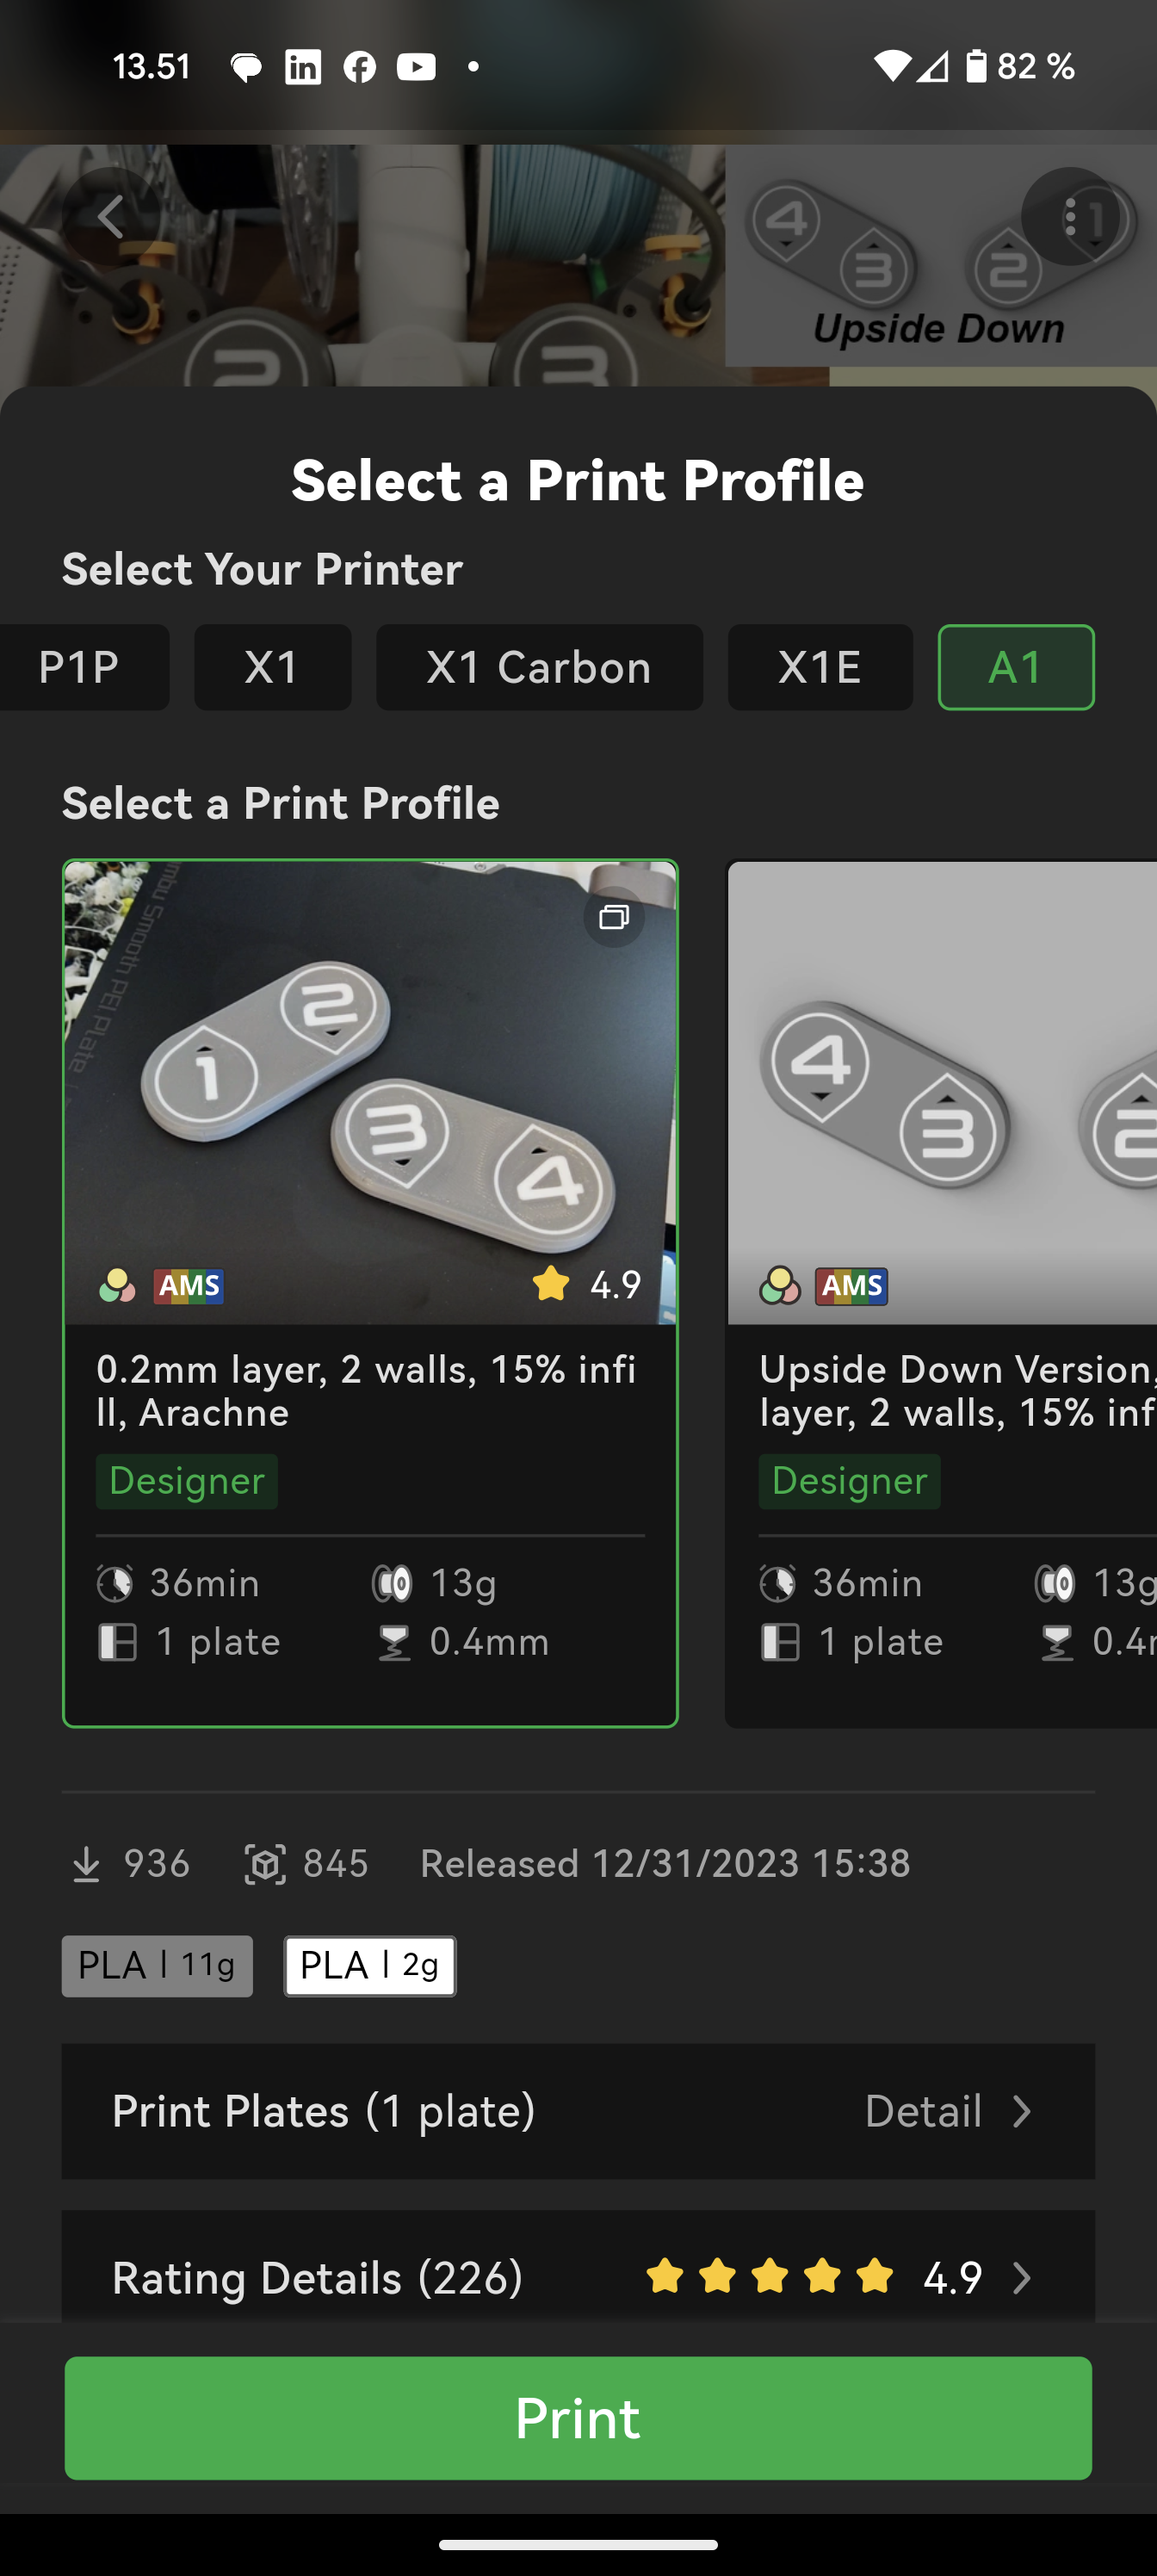
In addition to browsing the files via the app, you can also start the prints directly from the app with a few clicks. All it requires is that the file is available with an A1 profile. If it is, you get an overview of how long the print will take, as well as how much material will be used, and then just press print.
The files are then sent via Bambu Lab's cloud service to your printer and even sliced as part of that process.
If you have your own files and would like a little more detail with settings etc., you can skip your PC and use the Bambu Studio slicer to prepare the files.
Normally I use Orca Slicer for my FDM prints, but a large part of the functions it contains are taken precisely from Bambu Studio, so the software feels very familiar to me.
There is, of course, a built-in profile for the A1 printer in Bambu Studio and from here there is access to adapt and browse virtually all imaginable parameters in relation to your print.
In relation to my test, however, I have tried to keep it as simple as possible. This means that I have used the default settings that came with the A1 profile in the software.
Testing
Before I started to find other files, I took, just like with previous tests, one of the files that comes with the printer on the MicroSD card that is in the machine.
Here, of course, is the classic bency test, which was my first choice. When the print started, I got the opportunity to see the entire automatic process that the printer runs every time before it starts a print.
It includes, among other things, an automatic bedleveling process, which ensures that things fit every time. Another process it also runs through is a cleanup of your hotend. This means that the machine runs a bit of filament through to make sure there is a fine flow and then it mechanically cleans the tip of your nozzle.
The little clump of filament kicks the machine to the side before moving on. It also runs through the same process when changing color or filament type, if you run a print with more than one color.
This of course means that there is a continuous waste of filament, but it also means that at no time during my test did I experience a clogged nozzle.
The mechanical cleaning takes place on a small cleaning area at the back of your build plate, where there is a small silicone brush mounted for the purpose. It was a pleasure to see it all run so automatically before the printer started up on the print itself.
Not surprisingly, the A1 printer Bency handled the file without any problems and the file was ready after only a short quarter of an hour. So it is also a fast printer!
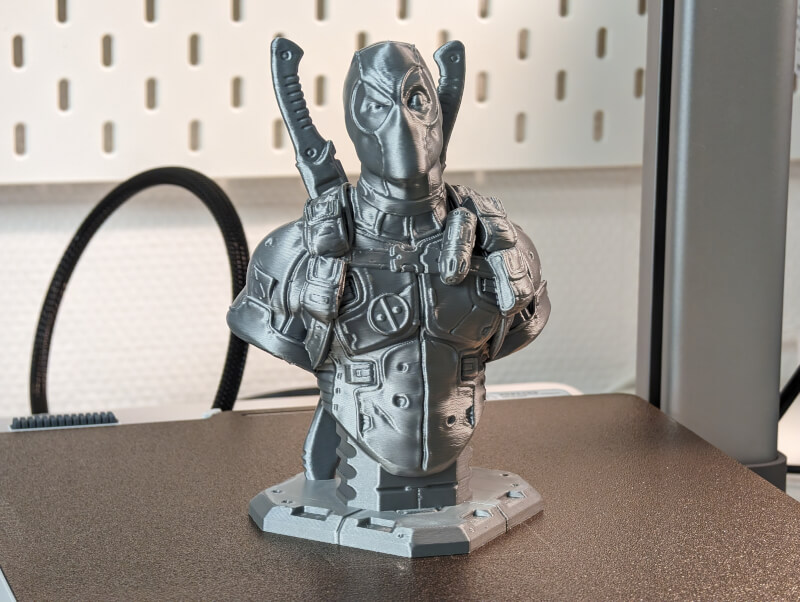
After this, it was the same Red Skull file that I use as a benchmark across all my 3D Printer tests.
Here I stopped by Bambu Studio to slice the file and used the regular settings that came with the A1 profile for the program along with Auto Tree Supports. So no adjustments on that front.
I chose, just like in my A1 Mini test, to make use of the Variable Layer Height option, to make the top of the figure as nice as possible. The top of round objects is typically one of the weak sides of FDM printing, unless you use a low layer height, which then means you get a slower print.
However, via Bambu Studio it is possible to make it variable, so I used a 0.20mm layer height for the print overall, but switched to 0.08mm on the top top of the print, to maximize the quality there.
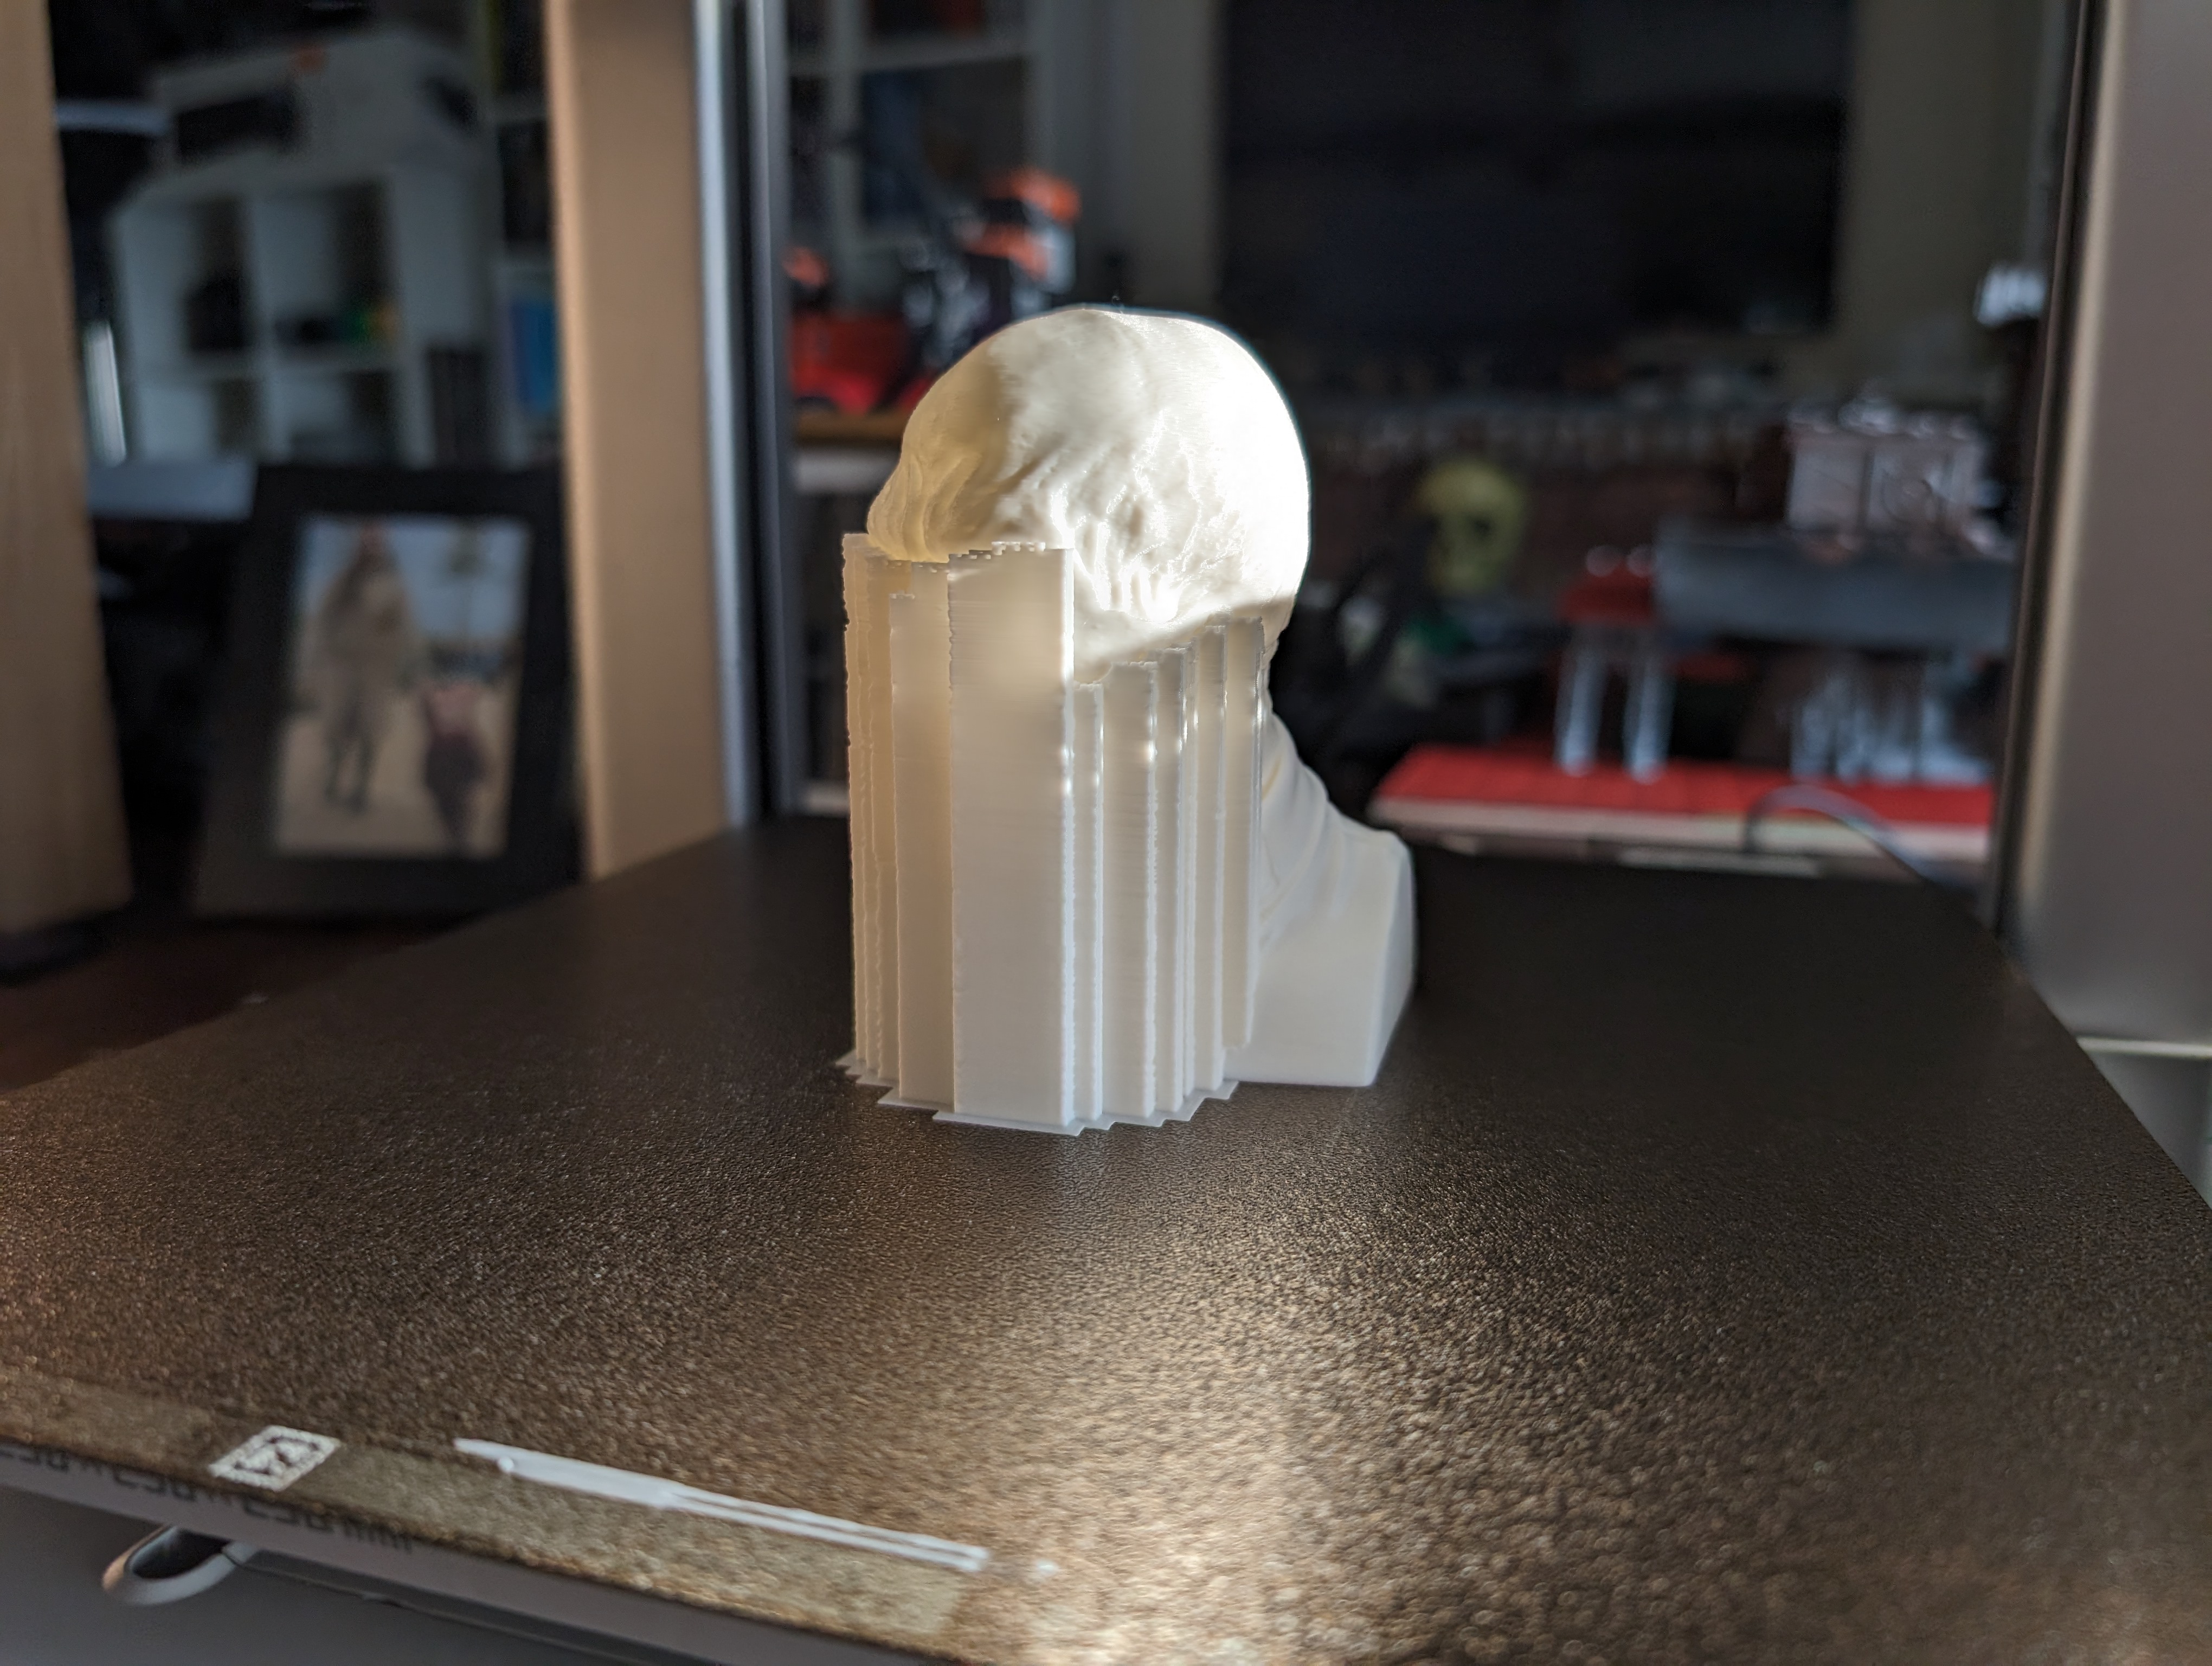
The result was a super fine Red Skull bust with some incredibly fine surfaces even at the top of the figure.
It's still nowhere near the Resin print version from the Elegoo Jupiter SE printer, but clearly the best FDM offer I've seen.
From here I threw myself at a multitude of different files both via the Bambu Handy app and via my PC and the Bambu Studio slicer.
Across the board, I was super impressed both by the quality of the prints, but also by the ease of use.
All my test prints came out without problems and at no time did I adjust settings, level the printer or any of the other things that are usually a regular part of FDM printing.
On top of that, the A1 also managed together with the AMS unit to make beautiful prints in several colours. It worked easily and straight forward, and the only downside is the waste of filament that you create when the printer continuously switches back and forth between the colors.
All in all, it has once again been a pleasure to have a visit from the Bambu Lab printer. The user-friendliness is top notch, and even though the A1 printer can technically print some large and advanced things, I enjoyed most of my test period printing less nice things. Files that I, for example, found together with my daughter through the Bambu Handy app.
The printer had no problems printing articulated objects such as this "Spider Squid" figure, which my daughter, who is the biggest Spider-Man fan in the house, still proudly shows off to virtually all guests, because she helped make it. .
However, I also printed functional files, such as accessories for the printer itself and the AMS Lite device. Among other things, it was a collector for the filament "poops" that it throws out to the side when it starts up or changes color. I also printed new number pieces for the AMS Lite unit, which partly makes it easier to see which space is which, and partly supports the PTFE tubes that go from the AMS Lite to the printer itself.
All files that I found via the Bambu Handy app and therefore didn't even need to start up my PC to get started.
It's that kind of accessibility that makes a printer like this one that wins my heart. Being able to involve my 3½-year-old daughter in the 3D Print hobby, and with a few clicks in an app start a print that after a few hours has produced a new piece of interactive toy is worth its weight in gold.
No need to tune settings, mess with computer and slicer software means it's a much more immediate experience for that sort of thing. It makes it SO much easier to involve the family and people who are not necessarily tech firms.
On top of that, you can easily skip your PC and tune settings here and make far more advanced prints ready when you need it.
Price
Bambu Lab is currently running offers on a wide selection of their printers. This means that the A1 in the combo version with the AMS Lite unit, which I looked at today, can right now be found on their own website, with shipping for 489$.
If you don't want the AMS Lite unit, you can get a standard A1 for just 339$.
Both parts are super good deals, and you get a really good printer for the money.
However, the price is usually outside the offer period, respectively 559$ and 399$, which are still reasonable prices, considering the quality and functionality.
Conclusion
Just like with its little brother A1 Mini, it has been a pleasure to have a visit from the Bambu Lab A1 printer.
Although there has been a lot of development in the area of user friendliness of FDM 3D Printers in general, Bambu Lab raises the level considerably on that front, with an experience that is as close to plug and play as you can get with 3D printing.
Automatic calibration and good software integration mean that with the Bambu Lab A1 you get a 3D Printer where you can spend your time finding fun and good files, printing and enjoying them instead of troubleshooting, tweaking and adjusting the machine and settings.
So if your interest in 3D Print is primarily in the printed objects, and not in the actual adaptation and tuning of the machine, then the Bambu Lab A1 is one of the best offers I have tried to date.
If you can manage with a slightly smaller build volume, the A1 Mini is hard to beat, but if you want the option of larger prints, then the A1 printer here is one of the best you can get in this price segment.
I finish by repeating my conclusion of the A1 Mini review. We land with a final score of 10 and a Great Product Award. It is one of the products that, together with the A1 Mini, has surprised me the most for a long time and which manages to shift my expectations of technology in general. This level of ease of use and quality should be standard.
Advantage:
Disadvantages: