28 Aug
software


If you have not used Google Drive before, you may benefit from following this guide, where we go through the process of creating an account, uploading and downloading documents, sharing your files and getting the most out of the service.
Get started
Access to Google Drive
Step 1: If you don't already have one, create a Google Account before continuing with Drive. Signing up is free and gives you simple, synchronized access to all Google services. You will have to pay a fee if you want more than 15 GB of storage, but if you choose to do so, it will not affect your ability to use the service. Downloading and including Google Chrome can also be advantageously chosen, as the popular web browser contains several extensions and tools that integrate well with Google Drive.
Step 2: Once you've signed up for Google Drive (or signed in to your existing account), you can access Drive through your browser or the dedicated mobile app, which is currently available for both Android and iOS.
Navigation
Navigation
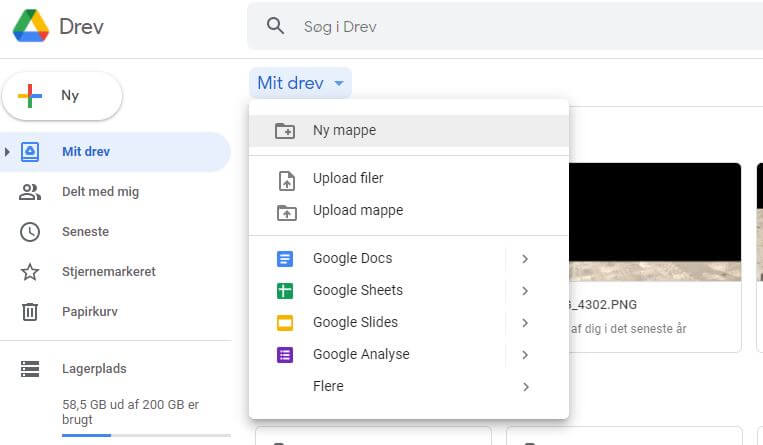
Once you're signed in to Drive, click the multi-colored plus sign New button in the top left corner or My Drive, which is located toward the center of the screen. In the mobile app, tap the circle with the plus sign in the lower right corner. This will open a menu that allows you to create or upload a file to Google Drive. You can create a spreadsheet, spreadsheet, slideshow presentation, shape, drawing and a lot of other things through third-party apps.
We won't go into depth on how to use each of these free programs here, but here are a few tips to learn how to use these services quickly and easily:
Tip 1: The buttons across the Drive are pretty straightforward, but if you're unsure of what to do, just hover over the point with your mouse. Here, a pop-up window will appear explaining the function of the button.
Tip 2: If you've ever used Microsoft Office - ie. Excel, Word or PowerPoint - then Google's Sheets, Docs and Slides software will look familiar. They work in the same way and are arguably more intuitive. You won't find as many advanced features as in Microsoft's software, but Drive is free, so that's to be expected.
Tip 3: Although you can use the main Docs, Sheets or Slides page to see all the files in one place, for many, creating folders can be a better way to stay organized. To create a folder, click the New button in the upper left corner, select Folder and name the file folder. Then just drag your files in the selected folder from the main page to Drive.
You can also Starred files you want to access later by clicking Add Star in the item's menu, but remember that they can only be seen by the person who added them and not by those with whom you shared a particular item .
Tip 4: Another way to quickly find an item on your drive is to use the Search Drive feature. At the top of each page is a field where you can search for a file by name or file type. If you press the down arrow in this field or More search tools, you can enter additional information and search for files based on specific criteria, e.g. the date or who you shared the file with.
Get the most out of Google Drive
We have previously covered, How to get more out of Google Drive , so we do a small recap of this below.
Google Drive - Upload and share documents
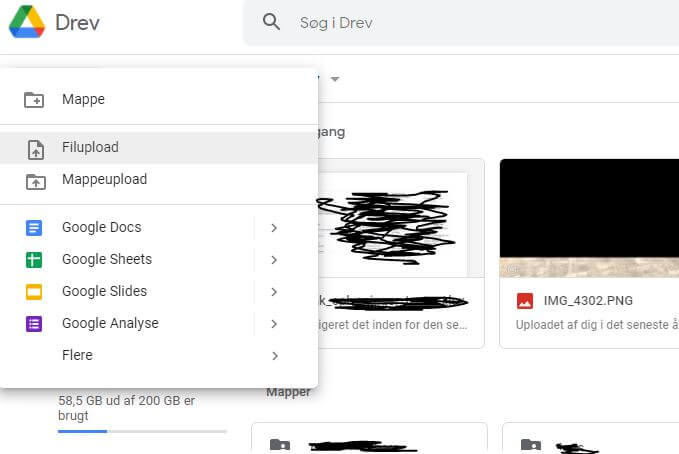
To upload a document to Drive, either click the Upload files button or Upload files under New or My Drive and select a file from your computer. This kind of cloud storage is great for personal use, but what sets it apart from other cloud services is its powerful and well-developed collaboration tools. If you need to work remotely with someone on a project, you can share a document with them and make changes together in real time.
If you want to share a document after you've created it, look in the upper right corner of the file window and find the Share button.
To share a document once you've created it, click the Share button in the top right corner, add your collaborators using their email addresses, and click the blue Done button. Once they have access, the document should appear under the Shared With Me tab in their Drive dashboard, and a link to the shared document will also be sent to their email inbox.
You can use the shareable link at the bottom of the Share menu to send the file via text or another messaging service. Click on Copy link at the bottom of the menu.
While inside a shared document, you can see who else is currently editing it by looking in the upper-right corner of the window. Names of business partners are displayed in different colors (or with their account picture), so you can quickly distinguish them from each other. Hover over any color to see who it represents.
Download documents and access files offline
Another useful feature is the ability to view and edit files even if you don't have access to the Internet. All you need to do is download the Google Docs Offline extension for Google Chrome. Once downloaded - and enabled in your Drive settings - you can access certain files (Docs, Sheets and Slides) even when you're traveling or without an internet connection for a few hours. A gray circle with a lightning bolt through it appears next to your file name in the file window, so you know when you're offline.
However, one of the downsides to this is that you can only access files you've created yourself and haven't shared with anyone. You must also have already opened the cloud storage in your browser to do so. There is also access to data offline via the mobile app, provided you have previously activated the function in Settings.
Adding more collaborators via a Google group
If you want to share a document with a large group of people, you can avoid entering each email address individually by sharing the document with an entire Google group. Every person in that group (as well as people who are added to the group later) will then have access to what you've shared.
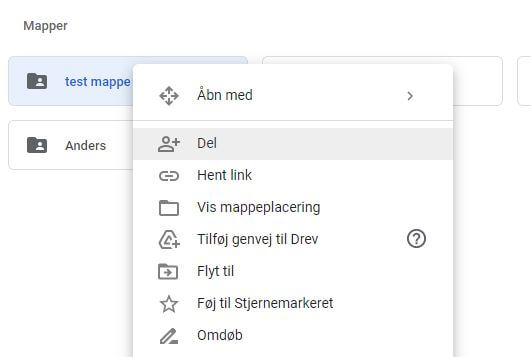
Should you need to share a lot of files at once? Instead of sharing each file individually, you can move them to a folder and share that folder. Anyone you share the folder with has access to all the data inside it.
Converting documents created with other programs
Need to share a document with colleagues or friends so they can collaborate on it, but already have the file in another similar program? No need to panic twitches.
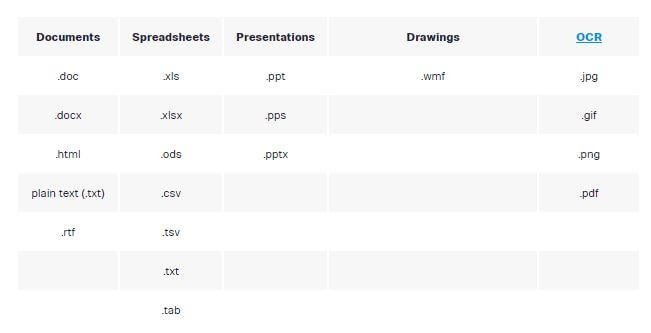
As long as the documents are in the correct format, most files can easily be converted to Google Docs, which can then be shared and edited together. To do this, simply upload the desired file and open it in Google Drive. Then, in the document preview screen you are presented with, select the Open with drop-down menu. Depending on the file type, Google will suggest the appropriate program to open it with. Select a program from this menu to convert it to a Google Docs format. Below are the file formats that can currently be converted to Google Drive.
Changing an older version of a document
A significant problem with cross-collaboration is that it's generally a challenge to fix something that someone else messed up. Especially with live documents that multiple people have access to, keeping track of changes easily becomes a challenge . Fortunately, you don't have to frown if you find yourself in one of these situations - Google has thought of this in a rather clever way. Drive stores each updated version of your documents for 30 days or 100 revisions, whichever comes first. The built-in save function makes it easy to return to an older version of a file (even multiple times).
To retrieve an older revision of a document, open the file you want to modify. Click File and then Version History. Then select View Version History. A new screen will open and a bar will appear on the right side of the document. This bar shows the previous revisions in chronological order. Click on one of them to preview the specific revision. If it's the one you're looking for, click the blue Restore This Version button that appears at the top of the screen. Click on it to return the document to that version. The version history also allows you to see who made changes. Be sure to be aware of who has edit rights versus read-only rights when sharing documents to avoid unauthorized changes.
Also read:
Incognito - and other new privacy measures from Google
Google + 10 things that make a difference [Updated]
Google Drive: Soon you can open encrypted files
Other Software guides


